I am realy, realy amazed. 50 Followers. Thanks to you all.
As promised, I want to give something back to all of you. So, I am going to give away some of the things I myself enjoy very much.
So! First of all, you will get any 3 of the XL image plates by Chez Delaney/Magno Nails
1 XL stamper
1 4ml bottle of my black holo franken
2 Anny Nail Polishes (one in each of your two favorite colours), Anny does amazing creme finish polishes!
1 10ml bottle of David Topcoat
All you have to do is leave me a comment, telling me which plates you want, what your two favorite colours are and a way to contact you if you win (NO ENTER ME COMMENTS!!!). Everyone gets one entry, all of you entrants, who have followed me before this post gets up will get 5 additional entries and everyone who follows me after will get 3 additional entries. So, who leaves a comment without following, gets one entry (no, leaving multiple comments will not get you multiple entries!), who followed me before the time this post gets up gets 6 entries and everyone who follows after gets 4 entries all in all :)
This giveaway will run till Juli 25th at midnight CET, so 50days. I will use randomizer.org to pick the winner, then I'll contact the winner via the method given in the comment. You, if you win, will have 48hours to get back to me with your mailing address, otherwise the prize will go to someone else. If you are under the age of 18, please ask your parents for permission! This giveaway is open internationally.
You can see the plates here: http://www.magnonails.de/shop/Nail-Stamping/Stamping-Schablonen/XL-Schablone/
and the polishes here: http://www.douglas.de/douglas/Make-up-N%25C3%25A4gel-Nagellack-Anny-Nagellacke-Nail-Polish_productbrand_3000041198.html
--
Ich bin wirklich hin und weg. 50 Follower! Dankeschön euch allen.
Wie versprochen möchte ich euch etwas zurückgeben. Ich werde ein paar Dinge verschenken, die mir selbst sehr gut gefallen.
Also! Als allererstes gibt es 3 XL Stempel Schablonen von Chez Delaney/Magno Nails eurer Wahl.
1 XL Stempel
1 4ml Flasche meines schwarzen Holo Franken Lackes
2 Anny Nail Polishes (je eine in einer eurer zwei Lieblingsfarben), Anny macht wirklich grandiose Creme Finish Lacke!
1 10ml Flasche vom David Topcoat
Das einzige, was ihr tun müsst um zu gewinnen ist, mir einen Kommentar zu hinterlassen, in dem ihr mir mitteilt welche drei Schablonen ihr wollt, was eure beiden Lieblings-Lack-Farben sind und wie ich euch in dem Falle, dass ihr gewinnt erreichen kann (Kommentare mit ENTER ME, oder ähnlichem werden von der Teilnahme ausgeschlossen). Jeder der Kommentiert bekommt EIN Ticket, alle, die vor dem Online-gehen dieses Posts Follower waren bekommen zusätzlich FÜNF Tickets und alle, die danach Follower sind bekommen zusätzlich DREI Tickets.
Also: Non-Follower, die einen Kommentar hinterlassen bekommen ein Ticket (nein, mehrere Kommentare bedeutet nicht mehrere Tickets!), Follower vor dem Onlinegehen dieses Posts haben insgesammt 6 Tickets und Follower danach insgesammt 4 Tickets.
Dieses Giveaway endet am 25. Juli um Mitternacht Mitteleuropäischer Zeit, also 50 Tage. Ich werde randomizer.org benutzen um den Gewinner auszulosen, dann kontaktiere ich den Gewinner, welcher anschliessend 48 Std Zeit hat, sich bei mir mit seiner Adresse zu melden, andernfalls geht der Gewinn an jemand anderen. Wenn ihr unter 18 seid, dann bittet eure Eltern um Erlaubnis! Dieses Gewinnspiel ist für jeden, weltweit offen.
Die Schablonen könnt ihr hier sehen: http://www.magnonails.de/shop/Nail-Stamping/Stamping-Schablonen/XL-Schablone/
und die Lacke hier: http://www.douglas.de/douglas/Make-up-N%25C3%25A4gel-Nagellack-Anny-Nagellacke-Nail-Polish_productbrand_3000041198.html
Sonntag, 5. Juni 2011
Freitag, 3. Juni 2011
NOTD: Peacock Feather
Stamping my nails is so much more fun with the new XL stamper :)
I had this Idea in my head for a long time, and I realy like it.
--
Nail Stamping macht so viel mehr Spass mit meinem neuen XL Stamper :)
Diese Idee habe ich jetzt schon eine ganze Weile mit mir rumgetragen, ich finde es sehr hübsch.

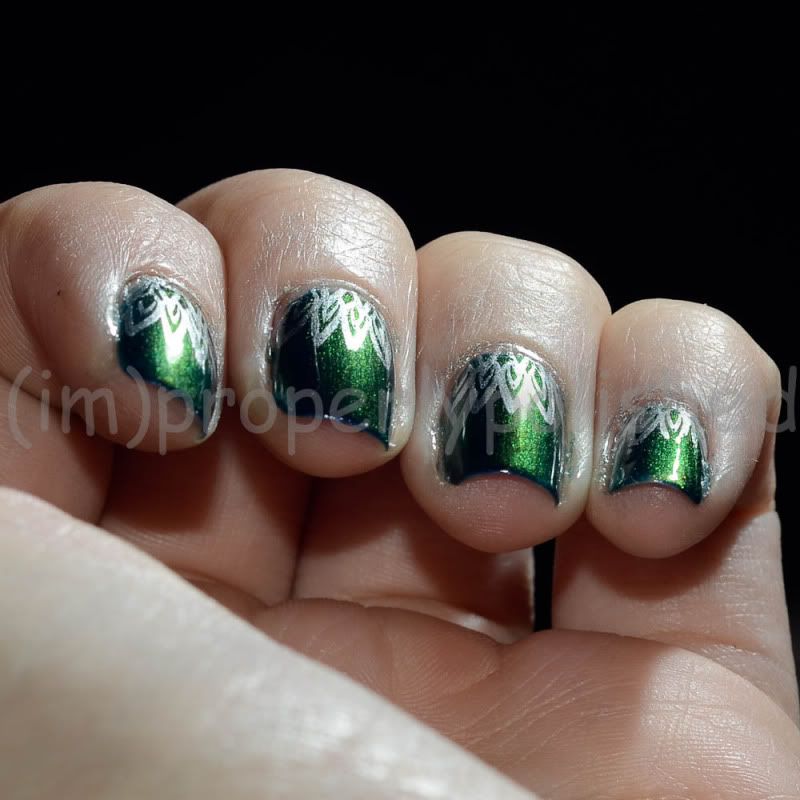
Nubar Peacock Feather, stamped with Bundlemonster Plate BM 212 and a silver stamping polish off of ebay. Basecoat: Micro Cell 3000, Topcoat: David
--
Nubar Peacock Feather, gestempelt mit Bundlemonster Schablone BM 212 und einem silbernen Stempel-Lack von Ebay. Unterlack: Micro Cell 3000, Überlack: David
I had this Idea in my head for a long time, and I realy like it.
--
Nail Stamping macht so viel mehr Spass mit meinem neuen XL Stamper :)
Diese Idee habe ich jetzt schon eine ganze Weile mit mir rumgetragen, ich finde es sehr hübsch.
Nubar Peacock Feather, stamped with Bundlemonster Plate BM 212 and a silver stamping polish off of ebay. Basecoat: Micro Cell 3000, Topcoat: David
--
Nubar Peacock Feather, gestempelt mit Bundlemonster Schablone BM 212 und einem silbernen Stempel-Lack von Ebay. Unterlack: Micro Cell 3000, Überlack: David
Colour Comparison: Essie Going Incognito vs. Essence Trust in Fashion
I was asked by Ulmiel to compare Essie Going Incognito with Essence Colour & Go Trust in Fashion, since they are kinda similar. I have to say up front, that they are not dupes!
--
Ich wurde von Ulmiel gebeten Essie Going Incognito mit Essence Colour & Go Trust in Fashion zu vergleichen, da die beiden sich recht ähnlich sehen. Vorneweg sage ich schonmal: Dupes sind das nicht!
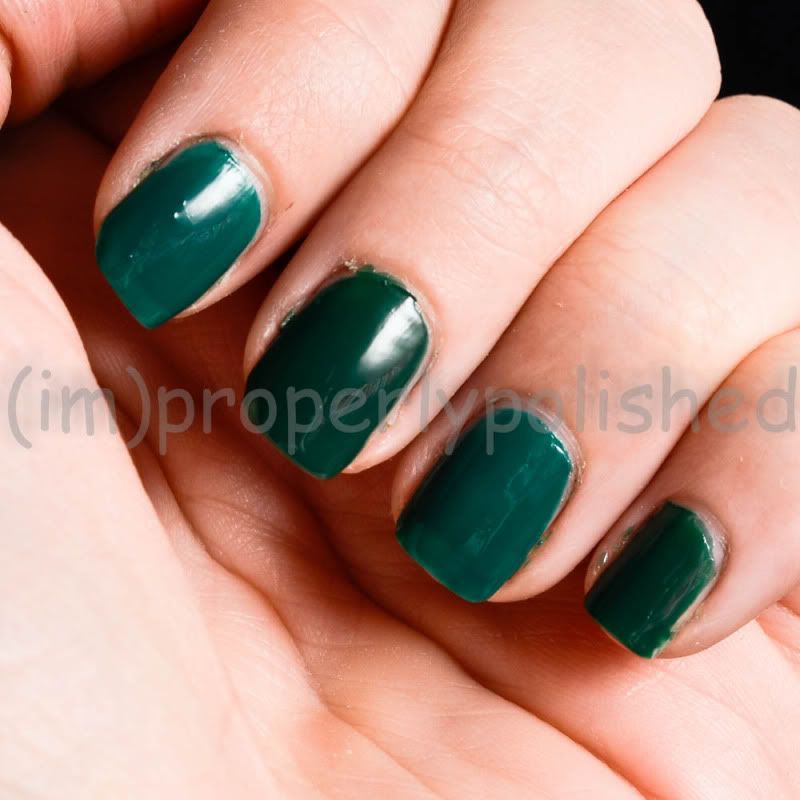
f.l.t.r./v.l.n.r.: Essence, Essie, Essence, Essie
As you can hopefully see, the Essence is more blue-based and lighter, than the Essie. Though all in all, I'd say, they are close enough, so you don't have to have both. As a plus for the Essence (besides the unbeatable price): I think the formula is nicer, and the brush is pretty good. The Essie is runny and tends to settle into my cuticles, ergh. The Essie is more opaque, needing only two coats, while the Essence needs a third.
--
Wie ihr hoffentlich sehen könnt, ist der Essence Lack bläulicher und heller als der Essie. Alles in allem würde ich aber sagen, dass sie sich ähnlich genug sind, dass man nicht beide braucht. Ein Pluspunkt für den Essence (neben dem super Preis): Die Formel ist meiner Meinung nach besser und der Pinsel ich echt gut. Der Essie Lack ist sehr flüssig und sammelt sich bei mir an den Nagelrändern, bäääh. Der Essie ist allerdings deckender und braucht nur zwei Schichten, während der Essence doch noch eine dritte vertragen kann.
--
Ich wurde von Ulmiel gebeten Essie Going Incognito mit Essence Colour & Go Trust in Fashion zu vergleichen, da die beiden sich recht ähnlich sehen. Vorneweg sage ich schonmal: Dupes sind das nicht!
f.l.t.r./v.l.n.r.: Essence, Essie, Essence, Essie
As you can hopefully see, the Essence is more blue-based and lighter, than the Essie. Though all in all, I'd say, they are close enough, so you don't have to have both. As a plus for the Essence (besides the unbeatable price): I think the formula is nicer, and the brush is pretty good. The Essie is runny and tends to settle into my cuticles, ergh. The Essie is more opaque, needing only two coats, while the Essence needs a third.
--
Wie ihr hoffentlich sehen könnt, ist der Essence Lack bläulicher und heller als der Essie. Alles in allem würde ich aber sagen, dass sie sich ähnlich genug sind, dass man nicht beide braucht. Ein Pluspunkt für den Essence (neben dem super Preis): Die Formel ist meiner Meinung nach besser und der Pinsel ich echt gut. Der Essie Lack ist sehr flüssig und sammelt sich bei mir an den Nagelrändern, bäääh. Der Essie ist allerdings deckender und braucht nur zwei Schichten, während der Essence doch noch eine dritte vertragen kann.
Mittwoch, 1. Juni 2011
Review: Image Plates and Stamper from Magno Nails
Magno Nails (www.magnonails.de) is a german naildesign shop, that sells the same image plates as Chez Delaney (www.chez-delaney.com). As far as I know, both send internationally, you just have to request it at Magno Nails. They are reliable, the prices reasonable and very pleasant to deal with. I am not affiliated with them and I HAVE paid for my two orders with them myself, I just think, they do a good job and the products are fabulous!
On to the review. I ordered a good bunch of the A Series (I already owned a few of the H Series, i bought off of ebay) plates, 4 of the XL plates and the XL Stamper.
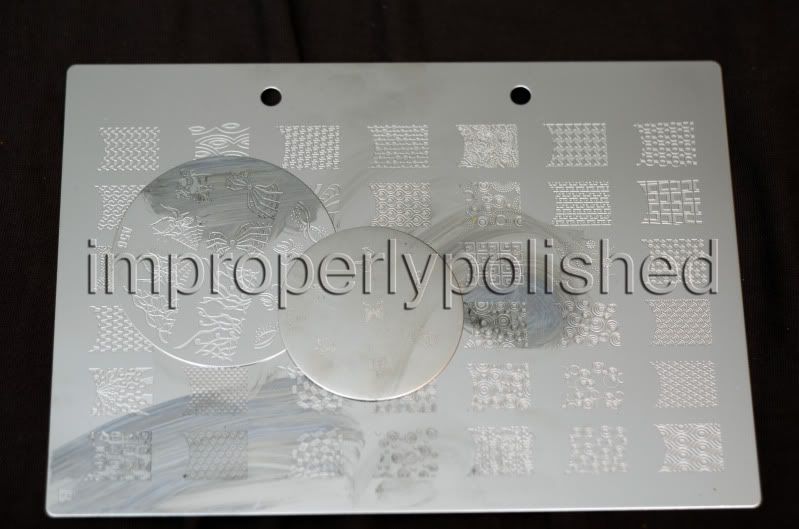
First of all, the plates (I cleaned them with nailpolishremover and now have this stuff left on there ... need to clean them properly later -.-). The XL plates are about Din A5 sized, so half the size of a piece of printing paper. They come with a thin film you have to remove first. The ones with the full nail/french tip designs (that's why the lower edge is curved) have 42! designs on them. Some are quite similar, but that is not such a big deal at the price of 15,99€ (about $23) a piece. They all work well, even the very delicate looking ones. They are pretty big (1,5cm wide and 2cm long), so there is no problem fitting them on your whole nail width-wise and with the curved edge they look good stamped only along the tips.
First I thought, I would find the big plates unwieldy, but actually, I quite like the size. They don't move around, when you scrape and with the holes in them, they are easy to store in a binder. All my other (small, round) plates are stored in small photo albums and it is kind of a hassle to get them in and out. It's easy to find images on these big plates, too, because you don't have to search through the small plates. I have ... well, let's just say a good bunch of small image plates from Konad, Bundlemonster and Magno Nails/Chez Delaney (whatever you wanna call them, I just call them Fauxnads) and looking for that ONE particular image, that would go perfectly wth the Idea in my head is not easy, when there are so many to go through, the big ones are easier to navigate.
The small plates are bigger than the Konad plates and have no plastic backing, so the edges are a wee bit sharp. Be carefull when handling them. Again, they stamp nicely, no problems even with the finer designs. The full nail/french images on both the XL and the smaller plates are too big to fit fully on the standard Konad stamper. That is not the only reason though, you should use the XL stamper, that is advertised to go with these plates. More on that later.
Both the XL and the smaller, round plates (A and H series) have a nice variety of designs. Not only floral (which is an issue to some with Konad) and some plates have mirrored versions of an image, which I think is realy cool. I LOVE the designs on these plates and since I've got them, I have rarely used other plates (Bundlemonster or Konad)
I have to say, that I use a plastic card for scraping, which to me, makes it easier to scrape lightly and prevent the scraper from digging the polish back out of the crevices of the plates. Another plus to this: no scratches on my plates! With the Konad stamper I had a few issues and had to work quickly to stamp my images, some would transfer only partially, but I have the same problem with some Konad plates. That changed completely, when I got the XL Stamper.
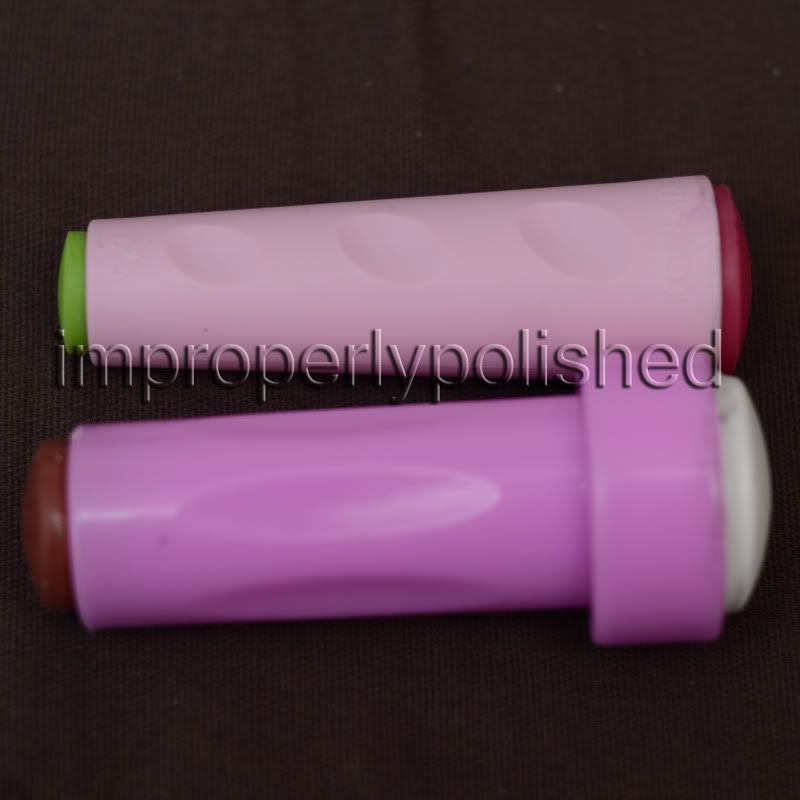
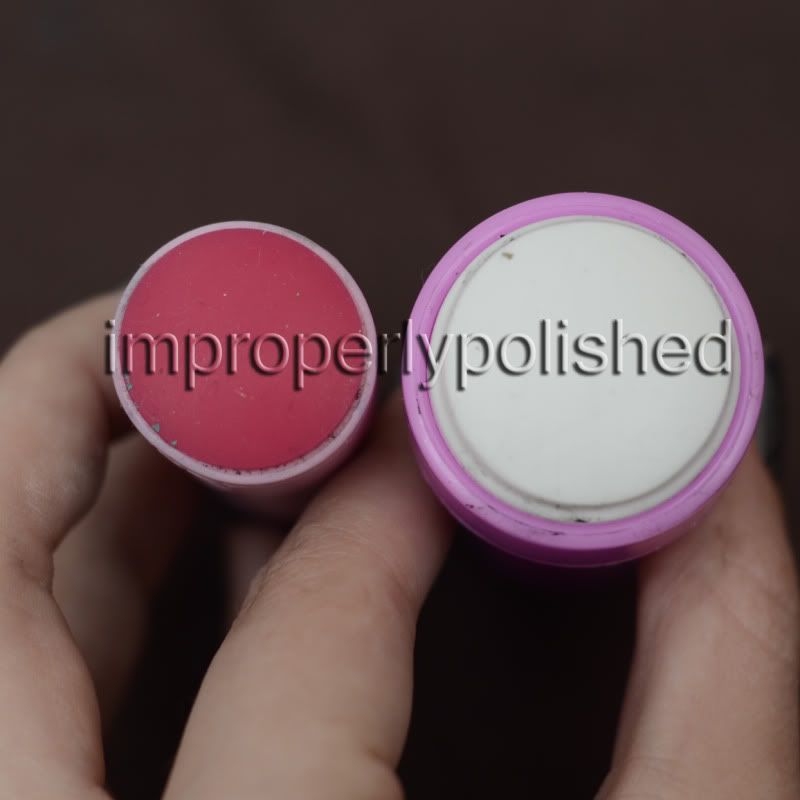
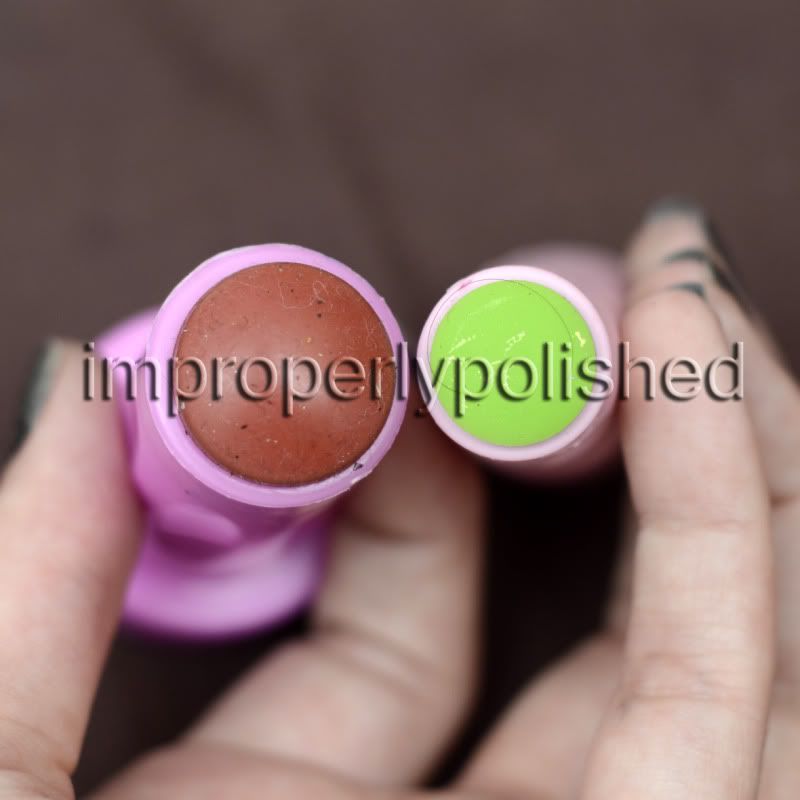
Seriously, this thing is MAGIC! I recommend this to EVERYONE into stamping. The pads are kinda sticky and it picks up images like nobodys business. Sadly, it picks up lint like nobodys business, too. But that is easily remedied by swiping it with some acetone or nailpolishremover or washing the pads with lukewarm water and dishsoap (not handsoap, the oils in there are not a good thing to have on a stamper). Even images I had real difficulties picking up completely transfered like a dream with this thing.
Both pads are bigger than their respective counterparts on the Konad Doublesided Stamper, so the big one fits the oversized images very well and the small one is almost big enough to comfortably fith the normal sized images on the Konad and Bundlemonster plates. I use the big stamper for all full nail designs and the small side for smaler images (which I rarely do ... just don't realy dig the look of the random little pictures on the nails)
This stamper is very squishy, which is the second part of it's magic. You don't roll the stamper over image and nail, you just plopp it down, like a regular stamp. The pads mold to your nails perfectly and transfer the image flawlessly. My nails are very curved and I used to have the problem of missing parts on the sides or images not lining up correctly, because with the old stamper I would have to wriggle it around to transfer the images fully on my nails. Not anymore, with the XL stamper. Just press it down lightly on the nail and voila, there is your image. If there was anything I would recommend to someone who is into nail stamping, I would say this stamper. It makes your live so much easier.
Now I have a few images from the plates I have, all stamped with a generic black stamping polish off of ebay.

As you can see, all, except the forth in the second row are pretty much perfect. That image is a PAIN in the booty to get right and the problem is more the scraping than the stamping.
If anyone is interested in any image stamped on paper or nails, just leave a comment. As a reference, here are all the Fauxnad plates I own:
A20 through A60
H1, 8, 11, 12, 19, 21, 22, 23, 24, 29
XL Plates A, B, C and D
you can look at the plates at the links at the top of this post :)
German version of this review coming up, it's just hell to translate it all :D and I realy wanted to get this up.
On to the review. I ordered a good bunch of the A Series (I already owned a few of the H Series, i bought off of ebay) plates, 4 of the XL plates and the XL Stamper.
First of all, the plates (I cleaned them with nailpolishremover and now have this stuff left on there ... need to clean them properly later -.-). The XL plates are about Din A5 sized, so half the size of a piece of printing paper. They come with a thin film you have to remove first. The ones with the full nail/french tip designs (that's why the lower edge is curved) have 42! designs on them. Some are quite similar, but that is not such a big deal at the price of 15,99€ (about $23) a piece. They all work well, even the very delicate looking ones. They are pretty big (1,5cm wide and 2cm long), so there is no problem fitting them on your whole nail width-wise and with the curved edge they look good stamped only along the tips.
First I thought, I would find the big plates unwieldy, but actually, I quite like the size. They don't move around, when you scrape and with the holes in them, they are easy to store in a binder. All my other (small, round) plates are stored in small photo albums and it is kind of a hassle to get them in and out. It's easy to find images on these big plates, too, because you don't have to search through the small plates. I have ... well, let's just say a good bunch of small image plates from Konad, Bundlemonster and Magno Nails/Chez Delaney (whatever you wanna call them, I just call them Fauxnads) and looking for that ONE particular image, that would go perfectly wth the Idea in my head is not easy, when there are so many to go through, the big ones are easier to navigate.
The small plates are bigger than the Konad plates and have no plastic backing, so the edges are a wee bit sharp. Be carefull when handling them. Again, they stamp nicely, no problems even with the finer designs. The full nail/french images on both the XL and the smaller plates are too big to fit fully on the standard Konad stamper. That is not the only reason though, you should use the XL stamper, that is advertised to go with these plates. More on that later.
Both the XL and the smaller, round plates (A and H series) have a nice variety of designs. Not only floral (which is an issue to some with Konad) and some plates have mirrored versions of an image, which I think is realy cool. I LOVE the designs on these plates and since I've got them, I have rarely used other plates (Bundlemonster or Konad)
I have to say, that I use a plastic card for scraping, which to me, makes it easier to scrape lightly and prevent the scraper from digging the polish back out of the crevices of the plates. Another plus to this: no scratches on my plates! With the Konad stamper I had a few issues and had to work quickly to stamp my images, some would transfer only partially, but I have the same problem with some Konad plates. That changed completely, when I got the XL Stamper.
Seriously, this thing is MAGIC! I recommend this to EVERYONE into stamping. The pads are kinda sticky and it picks up images like nobodys business. Sadly, it picks up lint like nobodys business, too. But that is easily remedied by swiping it with some acetone or nailpolishremover or washing the pads with lukewarm water and dishsoap (not handsoap, the oils in there are not a good thing to have on a stamper). Even images I had real difficulties picking up completely transfered like a dream with this thing.
Both pads are bigger than their respective counterparts on the Konad Doublesided Stamper, so the big one fits the oversized images very well and the small one is almost big enough to comfortably fith the normal sized images on the Konad and Bundlemonster plates. I use the big stamper for all full nail designs and the small side for smaler images (which I rarely do ... just don't realy dig the look of the random little pictures on the nails)
This stamper is very squishy, which is the second part of it's magic. You don't roll the stamper over image and nail, you just plopp it down, like a regular stamp. The pads mold to your nails perfectly and transfer the image flawlessly. My nails are very curved and I used to have the problem of missing parts on the sides or images not lining up correctly, because with the old stamper I would have to wriggle it around to transfer the images fully on my nails. Not anymore, with the XL stamper. Just press it down lightly on the nail and voila, there is your image. If there was anything I would recommend to someone who is into nail stamping, I would say this stamper. It makes your live so much easier.
Now I have a few images from the plates I have, all stamped with a generic black stamping polish off of ebay.
As you can see, all, except the forth in the second row are pretty much perfect. That image is a PAIN in the booty to get right and the problem is more the scraping than the stamping.
If anyone is interested in any image stamped on paper or nails, just leave a comment. As a reference, here are all the Fauxnad plates I own:
A20 through A60
H1, 8, 11, 12, 19, 21, 22, 23, 24, 29
XL Plates A, B, C and D
you can look at the plates at the links at the top of this post :)
German version of this review coming up, it's just hell to translate it all :D and I realy wanted to get this up.
Dienstag, 31. Mai 2011
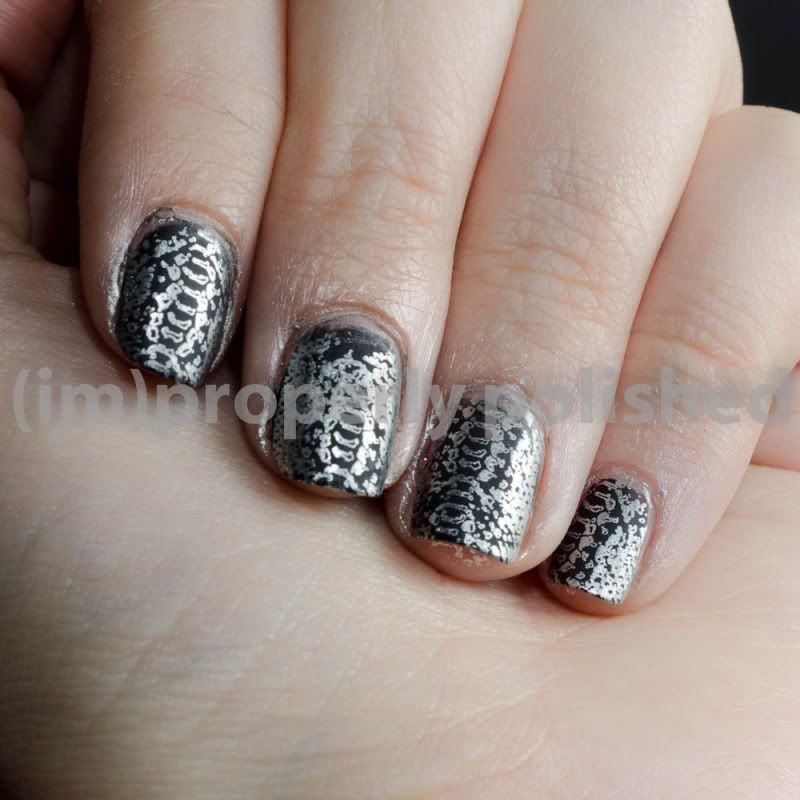
Black and Silver Snakeskin
I was experimenting with my Chez Delaney/Magno Nails plates and the XL stamper and came up with this cool, matte snakeskin manicure.
I will definitely do a review on these plates and this stamper, but the short version is: amazing. Especially the stamper!
I will get to the requests hopefully the day after tomorrow.
--
Ich habe ein wenig mit meinen Chez Delaney/Magno Nails Image Plates und dem XL Stamper rumexperientiert und raus kame diese coole, matte Schlangenoptik.
Ich werde auf jedenfall ein Review zu diesen Plates und dem Stamper machen, aber die kurze Version ist: SUPER! Besonders der Stamper.
Ich werde hoffentlich übermorgen dazu kommen die mir gestellten Requests zu erfüllen.
Dienstag, 24. Mai 2011
I don't need no stinkin' private jet!
The lovely Kris from My Lucid Bubble made an absolutely fabolous discovery. The pigment named SpectraFlair (and all the pigments like it) make for gorgeous linear Holos! It's a pigment meant for automobile varnish, so I won't be hold responsible for anything.
Here a few pictures of my black linear Holo in sunlight. More Pictures of other Holo-Frankens and Info how, where, what to come.
--
Die wunderbare Kris von My Lucid Bubble hat eine grandiose Entdeckung gemacht. Das Pigment SpectraFlair (und alle Pigmente, die diesem ähnlich sind) eignen sich hervorragend zur Herstellung von linearem holo-Effekt in Nagellacken! Diese Pigmente sind für Autolacke gedacht, ich übernehme also keine Verantwortung!
Hier jetzt ein paar schnelle Sonnenlicht Bilder meines schwarzen linearen Holo-Lackes. Mehr Bilder von anderen Holo-Frankens und Infos über das wie, wo, was kommen bald.

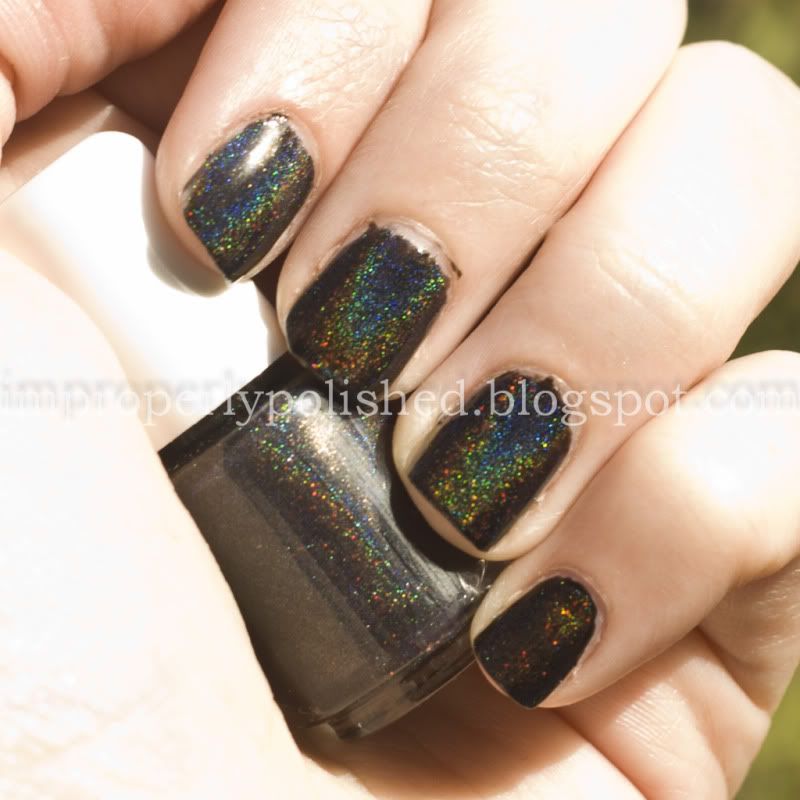
One coat of the Franken over Orly Black Vinyl. Basecoat is Micro Cell 2000, no Top Coat
--
Eine Schicht von meinem Frankenlack über Orly Black Vinyl. Unterlack ist Micro Cell 2000, kein Überlack
Here a few pictures of my black linear Holo in sunlight. More Pictures of other Holo-Frankens and Info how, where, what to come.
--
Die wunderbare Kris von My Lucid Bubble hat eine grandiose Entdeckung gemacht. Das Pigment SpectraFlair (und alle Pigmente, die diesem ähnlich sind) eignen sich hervorragend zur Herstellung von linearem holo-Effekt in Nagellacken! Diese Pigmente sind für Autolacke gedacht, ich übernehme also keine Verantwortung!
Hier jetzt ein paar schnelle Sonnenlicht Bilder meines schwarzen linearen Holo-Lackes. Mehr Bilder von anderen Holo-Frankens und Infos über das wie, wo, was kommen bald.
One coat of the Franken over Orly Black Vinyl. Basecoat is Micro Cell 2000, no Top Coat
--
Eine Schicht von meinem Frankenlack über Orly Black Vinyl. Unterlack ist Micro Cell 2000, kein Überlack
Montag, 23. Mai 2011
Still Alive
Just a short update. I am still alive and will continue this blog soon. I'm doing my final projects to get my journeyman's certificate, next monday will be my final exam. My nails are getting back into shape, after beeing completely destroyed, Micro Cell is helping a lot with that. I've gotten a few Chez Delaney image plates and I'm waiting on the Bundle Monster Sets, so expect some reviews and stamping NOTDs, it'll just take another week for me to get back into it.
--
Nur ein kurzes Update. Ich lebe noch und werde den Blog bald wiederaufleben lassen. Ich bin grade dabei meine letzten Projekte für meinen Gesellenbrief fertigzustellen, nächsten Montag ist dann mein letzter Prüfungsteil. Meine Nägel sind so langsam wieder fit, nachdem ich sie komplett zerstört habe, Micro Cell hilft wirklich ein ganzes Stück. Ich habe ein paar Chez Delaney stamping Schablonen bekommen und warte grade noch auf meine Bundle Monster Sets, also könnt ihr euch auf einige Reviews und gestampte NOTDs gefasst machen, ich brauch nur eine Woche um wieder einen Kopf für etwas anderes als Blende, Belichtungszeit, Komposition und Photoshop zu haben.
Donnerstag, 12. Mai 2011
Still hyperventilating
For some month now, Elizabeth from lacqueredlizard.blogspot.com and me are writing mails back and forth. It all started with her, wanting some P2 polishes, so I send her a few goodies, a little later, we decided, that we would get some "David" Topcoat (if you don't know, what that is, you should go read The Edge of Sanity.
Well, we ordered some of that realy cool and extremely cheap topcoat, I added a few empty polish bottles for frankening and sharing.
--
Seit einigen Monaten stehen Elizabeth von lacqueredlizard.blogspot.com und ich in E-Mail Kontakt. Es hat alles damit angefangen, dass sie ein paar P2 Lacke haben wollte, also habe ich ihr ein Paar Goodies zugeschickt. Später haben wir beschlossen, dass wir zusammen den "David" Topcoat ordern wollten. Wenn ihr nicht wisst, was das ist, solltet ihr The Edge of Sanity lesen.
Also, haben wir etwas von diesem sehr coolen und extrem günstigen Überlack bestellt, ich habe noch ein paar leere Lackfläschchen hinzugefügt.
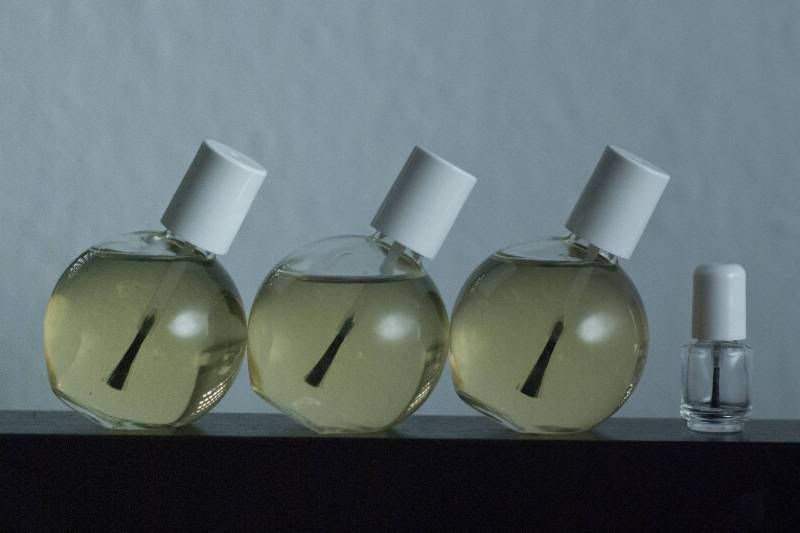
The middle bottle of David already has such a big dent, because I promised some to a friend.
--
Die mittlere David Flasche ist schon etwas geleert worden, da ich einer Freundin etwas davon versprochen hatte.
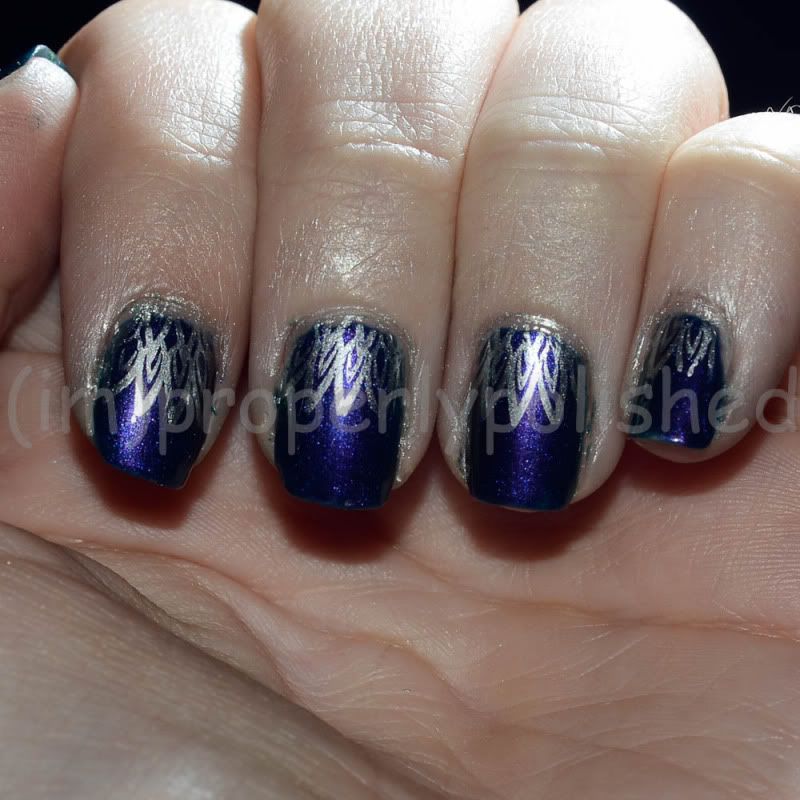
Elizabeth, beeing the wonderful crazy-person she is, added a "few" goodies. I started pulling out little bubblewrap bundles one after the other and I am still in AWE!
--
Elizabeth, die wundervolle Irre, konnte es nicht lassen und hat mir ein "paar" Goodies mit in das Paket gelegt. Ich habe angefangen ein kleines Päckchen nach dem anderen aus dem grossen Paket zu ziehen und bin immernoch hin und weg.

f.l.t.r./v.l.n.r Sally Hansen Gunmetal, Virtual Violet, Purple Pizzazz, The Real Teal, Grey Area, Going Green

f.l.t.r./v.l.n.r Rimmel Camouflage, Wet n Wild Blue wants to be a millionaire, Blue Moon, Saved by the Blue, Confetti Party Palace Blue
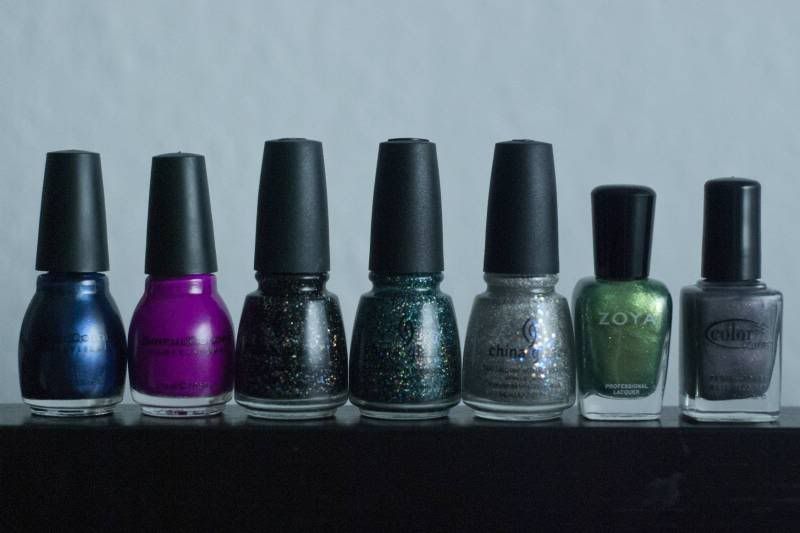
f.l.t.r./v.l.n.r Sinful Hotspot, Dream on, China Glaze Cosmic, Atlantis, Shooting Star, Zoya Apple, Color Club Snakeskin (I THINK, there was no lable/denke ich, die Flasche hatte kein Lable mehr)
Well, and then she went above and beyond! My jaw literally droped and I started shaking, when I pulled this gem out of there.
--
Naja, und dann hat sie sich selbst übertroffen. Mir ist buchstäblich die Kinnlade runtergefallen und ich habe angefangen zu zittern, als ich dieses Schmuckstück aus dem Paket gezogen habe.
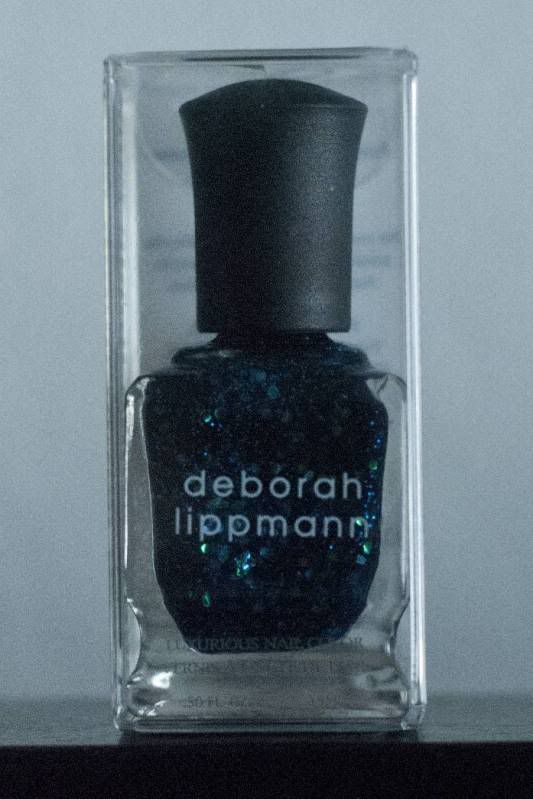
Deborah Lippmann Across the Universe
Thank you Liz, you are amazing and you made me an incredibly happy camper.
Well, we ordered some of that realy cool and extremely cheap topcoat, I added a few empty polish bottles for frankening and sharing.
--
Seit einigen Monaten stehen Elizabeth von lacqueredlizard.blogspot.com und ich in E-Mail Kontakt. Es hat alles damit angefangen, dass sie ein paar P2 Lacke haben wollte, also habe ich ihr ein Paar Goodies zugeschickt. Später haben wir beschlossen, dass wir zusammen den "David" Topcoat ordern wollten. Wenn ihr nicht wisst, was das ist, solltet ihr The Edge of Sanity lesen.
Also, haben wir etwas von diesem sehr coolen und extrem günstigen Überlack bestellt, ich habe noch ein paar leere Lackfläschchen hinzugefügt.
The middle bottle of David already has such a big dent, because I promised some to a friend.
--
Die mittlere David Flasche ist schon etwas geleert worden, da ich einer Freundin etwas davon versprochen hatte.
Elizabeth, beeing the wonderful crazy-person she is, added a "few" goodies. I started pulling out little bubblewrap bundles one after the other and I am still in AWE!
--
Elizabeth, die wundervolle Irre, konnte es nicht lassen und hat mir ein "paar" Goodies mit in das Paket gelegt. Ich habe angefangen ein kleines Päckchen nach dem anderen aus dem grossen Paket zu ziehen und bin immernoch hin und weg.
f.l.t.r./v.l.n.r Sally Hansen Gunmetal, Virtual Violet, Purple Pizzazz, The Real Teal, Grey Area, Going Green
f.l.t.r./v.l.n.r Rimmel Camouflage, Wet n Wild Blue wants to be a millionaire, Blue Moon, Saved by the Blue, Confetti Party Palace Blue
f.l.t.r./v.l.n.r Sinful Hotspot, Dream on, China Glaze Cosmic, Atlantis, Shooting Star, Zoya Apple, Color Club Snakeskin (I THINK, there was no lable/denke ich, die Flasche hatte kein Lable mehr)
Well, and then she went above and beyond! My jaw literally droped and I started shaking, when I pulled this gem out of there.
--
Naja, und dann hat sie sich selbst übertroffen. Mir ist buchstäblich die Kinnlade runtergefallen und ich habe angefangen zu zittern, als ich dieses Schmuckstück aus dem Paket gezogen habe.
Deborah Lippmann Across the Universe
Thank you Liz, you are amazing and you made me an incredibly happy camper.
Sonntag, 8. Mai 2011
Kreativ Blogger Award
I am so stumped! I have been given this award by the lovely Cristina.
Thank you sooo much!

So, I think, I will have to tell you guys 10 things about me:
1. I am a photographer with my heart and soul!
2. I collect dolls (Asian Ball Jointed Dolls, short ABJDs or just BJDs for short)
3. Me and my brother have the same Tattoo, that we designed together to represent us and our relationship
4. I'm a total Film-Nerd
5. I never seriously wore Make-up until 3 years ago!
6. I make most of my make-up myself
7. I love creating things
8. I am totally unorganized most of the time
9. I am unable to have plants ... they just die on me, the poor things
10. I can't live without music
Then, I will have to tag 10 people and tell them on their blog about it ... well, I will start with 5 people and update the other 5 when I have decided :D These are in no particular order.
First off is a wonderful friend of mine, Sissi. If you are able to read german, go and visit her blog, she has wonderfull poetry: http://ichbineinpoet.blogspot.com
Next up: lacqueredlizard.blogspot.com Elizabeth is one of the most wonderful souls I know, she is one of those people who just enriches your live and make the world that much more beautiful.
http://tines-kosmetik.blogspot.com/
http://chloesnails.blogspot.com/
http://ulmiel.blogspot.com/
Thanks again, Cristina
Thank you sooo much!
So, I think, I will have to tell you guys 10 things about me:
1. I am a photographer with my heart and soul!
2. I collect dolls (Asian Ball Jointed Dolls, short ABJDs or just BJDs for short)
3. Me and my brother have the same Tattoo, that we designed together to represent us and our relationship
4. I'm a total Film-Nerd
5. I never seriously wore Make-up until 3 years ago!
6. I make most of my make-up myself
7. I love creating things
8. I am totally unorganized most of the time
9. I am unable to have plants ... they just die on me, the poor things
10. I can't live without music
Then, I will have to tag 10 people and tell them on their blog about it ... well, I will start with 5 people and update the other 5 when I have decided :D These are in no particular order.
First off is a wonderful friend of mine, Sissi. If you are able to read german, go and visit her blog, she has wonderfull poetry: http://ichbineinpoet.blogspot.com
Next up: lacqueredlizard.blogspot.com Elizabeth is one of the most wonderful souls I know, she is one of those people who just enriches your live and make the world that much more beautiful.
http://tines-kosmetik.blogspot.com/
http://chloesnails.blogspot.com/
http://ulmiel.blogspot.com/
Thanks again, Cristina
Micro Cell update and WHOA!
I am on my 4th day of Micro Cell and I must say, I am impressed. My nails feel harder and more resistant already, without beeing brittle! No issues, yet, though I use cuticle oil regularily.
Then, I have to say: seriously guys? 40 followers? I am in awe, thank you. If you keep that up, I might have to do something special if we reach the 50 follower mark.
--
Ich bin bei meinem vierten Tag mit Micro Cell und ich muss sagen, ich bin beeindruckt. Meine Nägel fühlen sich härter und resistenter an, ohne brüchig zu sein! Bisher gibt es keine Probleme zu vermelden, ich benutze allerdings zusätzlich Nagelöl um die Nagelhäute vor dem Austrocknen zu schützen.
Dann muss ich sagen: Wirklich? 40 Follower? Ich weiss nicht, was ich sagen soll. Danke! Wenn ihr so weiter macht, muss ich mir etwas spezielles einfallen lassen, wenn wir die 50er Marke überschritten haben.
Freitag, 6. Mai 2011
Micro Cell 2000 Nail Repair
My nails are horrible at the moment. It probably thanks to the fact, that I change my polish almost daily, well ... I decided to try Micro Cell 2000. It is a nailhardener that claims to replenish your nails, as well as harden them and help them grow quicker. I use the "Matt" formula, which works the same as the regular, glossy one, it just looks satiny.
You are supposed to put on one coat the first day, another the next. Then on the third day remove it with nail polish remover (it says to use the Micro Cell one, but normal remover should do just fine) and repeat. You are supposed to do that for 2-3 weeks. After that, it is recomended to use it as a basecoat once a week.
It is a milky white liquid in a square nail polish bottle with a long, skinny brush that works quite well. It contains 2% Formaldehyde (no discussions about the stuff. I know about all the issues concerning health, if that is an issue for you, I suggest reading up on it and decide for yourself if you want to use it), which is quite hefty. It is meant for weak and brittle nails, but if your nails are too thin (after removal of acrylics for example) it's recomended to use the "Light" formula, which has less Formaldehyde.
It's not cheap at around 12€ ($17,50)!!! But it has very good reviews all around.
Yesterday was my first day and I will keep you updated how it goes.
--
Meine Nägel sind wirklich furchtbar im Moment. Das ist wahrscheinlich der Tatsache zu verdanken, dass ich meinen Lack gerne mal alle zwei Tage wechsle. Ich habe mich entschieden Micro Cell 2000 auszuprobieren. Ein Nagelhärter, der verspricht die Nägel nicht nur zu härten, sondern auch wichtige Stoffe zuzuführen und zu schnellerem Wachstum zu verhelfen. Ich habe die Matte Formel, die identisch ist zur normalen, ausser, dass sie satiniert trocknet und nicht glänzend.
Die Instruktionen besagen den Lack am ersten Tag einmal aufzutragen, am nächsten Tag eine zweite Schicht und am dritten Tag alles ablackieren mit Nagellack Entferner und danach wieder alles von vorne. Das soll man für 2-3 Wochen durchführen, danach dann den Lack einmal die Woche als Unterlack verwenden.
Es ist eine milchig weisse Flüssigkeit in einer eckigen Nagellackflasche mit langem, schmalen Pinselchen, der aber wirklich gut funktioniert. Enthalten sind 2% Formaldehyd (bitte keine Diskussionen über die Gefährlichkeit dieses Produktes, wenn das ein Problem sein sollte, schlage ich vor sich zu informieren und dann selbst zu entscheiden, ob man dieses Produkt nutzen möchte oder nicht.), was ganz schön heftig ist. Das Produkt ist für schwache, brüchige Nägel gedacht, allerdings ist es für sehr dünne Nägel (z.B. nach der Entfernung von Kunstnägel) zu stark. Da wird die "Light" Formel empfohlen, mit weniger Formaldehyd.
Das ganze ist nicht billig mit ca. 12€, allerdings verspricht es sehr gute Ergebnisse.
Gestern war mein erster Tag und ich werde euch auf dem Laufenden halten.
Montag, 2. Mai 2011
On pictures and the stealing thereof
I am very, very sorry, that I have to start putting watermarks on my images. This blog is not even a full month old and already my pictures get used on other sites without credit. I know, that it isn't pretty and I realy do apologise for it, but stealing pictures is not nice! You can link to my blog, if you like my pictures, that is fine, but copying them from my account and pasting them on forums and other sites with NO mention of me at all is just shoddy!
Sorry, again, for the rant. I realy appreciate all my followers and readers and I was hoping to get by without watermarks as long as possible, to make the pictures as good as possible for you. Well, now I am forced to make a point, by posting my copyright smack-dab in the middle of the pictures, so it's pretty much impossible to cut it off.
--
Es tut mir wirklich furchtbar leid, dass ich ab jetzt Wasserzeichen auf meine Bilder packen muss. Dieser Blog ist noch nicht mal einen vollen Monat alt und schon werden meine Bilder auf anderen Seiten benutzt, ohne Vermerk. Ich weiss, dass das nicht hübsch anzuschauen ist und ich entschuldige mich dafür, aber Diebstahl ist nicht nett! Ihr könnt auf meinen Blog linken, wenn euch meine Bilder gefallen, das ist total ok, aber meine Bilder von meinem Account zu kopieren und sie in Foren und auf anderen Seten zu posten, ohne mich und meinen Blog auch nur zu erwähnen ist hinterste Schublade!
Nocheinmal: Entschuldigung, besonders für's Aufregen. Ich bin wirklich glücklich über alle meine Follower und Leser und ich habe gehofft, so lang wie möglich ohne Wasserzeichen auskommen zu können, damit sie für euch so schön wie möglich anzuschauen sind. So aber muss ich jetzt ein Zeichen setzen, im wahrsten Sinne und das direkt mitten auf die Bilder, um es den Dieben so schwer wie möglich zu machen, mein Copyright abzuschneiden.
Mirror, Mirror ...
... on my nails. I got my nailfoils from dollarnailart.com today and, of course, I had to do a mani with the silver foils. I am totally speechless.
--
Spieglein, Spieglein auf meinen Nägeln. Heute kam das Paket von dollarnailart.com an und natürlich musste ich gleich mal eine volle Mani mit der Silber Folie machen. Ich bin sprachlos!
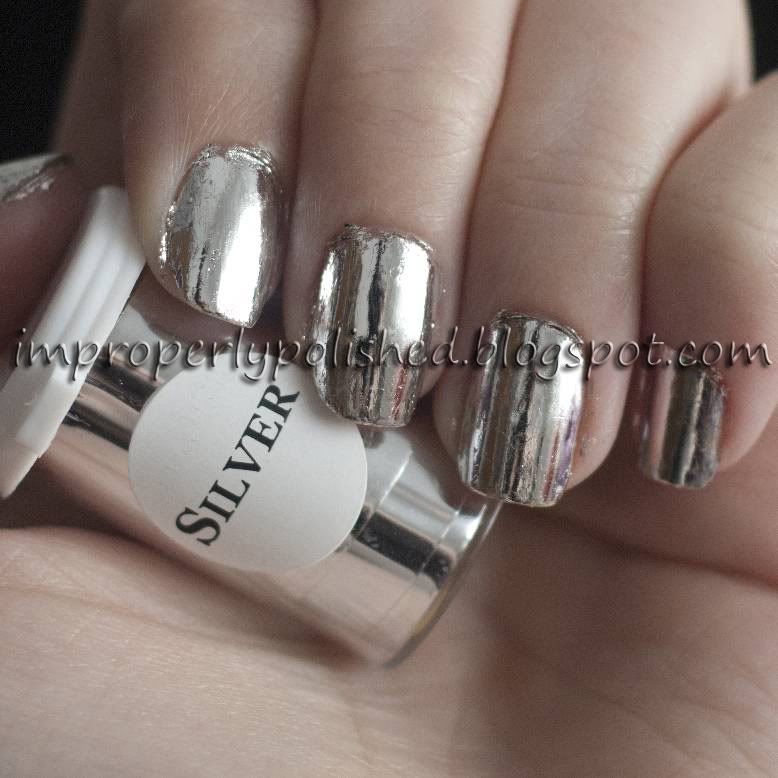
I used the foil over Orly Shine, just to be sure, that, if I missed a spot, it wouldn't be so visible. No topcoat and pre cleanup.
--
Ich habe die Folie über Orly Shine aufgetragen, damit, wenn ich irgendwo kahle Stellen hätte, diese nicht so sehr auffallen. Kein Überlack und das Foto ist vor dem "Aufräumen".
--
Spieglein, Spieglein auf meinen Nägeln. Heute kam das Paket von dollarnailart.com an und natürlich musste ich gleich mal eine volle Mani mit der Silber Folie machen. Ich bin sprachlos!
I used the foil over Orly Shine, just to be sure, that, if I missed a spot, it wouldn't be so visible. No topcoat and pre cleanup.
--
Ich habe die Folie über Orly Shine aufgetragen, damit, wenn ich irgendwo kahle Stellen hätte, diese nicht so sehr auffallen. Kein Überlack und das Foto ist vor dem "Aufräumen".
Mittwoch, 27. April 2011
NOTD and kinda, sorta EOTD April, 27th 2011
I kinda, sorta matched my eyeshadow to my nails today.
--
Heute habe ich meinen Lidschatten auf meine Nägel abgestimmt ... so ungefähr zumindest.

Essence Spicy, stamped with Sally Hansen Aquamarine Chrome. Konad Plate M82 (I believe). Basecoat: Orly Bonder with Orly Primetime as primer, Topcoat: Orly Sec'n'Dry.
--
Essence Spicy, gestempelt wurde mit Sally Hansen Aquamarine Chrome. Konad Schablone M82 (glaube ich). Unterlack: Orly Bonder mit Orly Primetime als Primer, Überlack: Orly Sec'n'Dry.
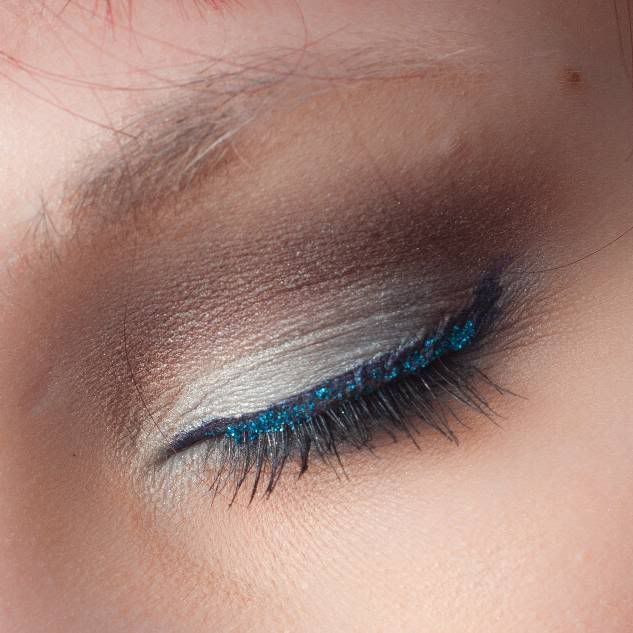
And the matching eyes. Sadly, the glitterliner does not show up in the picture.
--
Und die passenden Augen, leider sieht der Glitterliner nicht so dolle aus in dem Bild.
--
Heute habe ich meinen Lidschatten auf meine Nägel abgestimmt ... so ungefähr zumindest.
Essence Spicy, stamped with Sally Hansen Aquamarine Chrome. Konad Plate M82 (I believe). Basecoat: Orly Bonder with Orly Primetime as primer, Topcoat: Orly Sec'n'Dry.
--
Essence Spicy, gestempelt wurde mit Sally Hansen Aquamarine Chrome. Konad Schablone M82 (glaube ich). Unterlack: Orly Bonder mit Orly Primetime als Primer, Überlack: Orly Sec'n'Dry.
And the matching eyes. Sadly, the glitterliner does not show up in the picture.
--
Und die passenden Augen, leider sieht der Glitterliner nicht so dolle aus in dem Bild.
Dienstag, 26. April 2011
NOTD April, 26th 2011
I tried the sponge technique and am quite pleased for my first try. It looks much better from a normal viewing distance, the photo shows all the little dots, but still pretty.
--
Ich habe die Schwamm-Technik ausprobiert und bin eigentlich ganz zufrieden, für einen ersten Versuch. Es sieht aus ein bisschen Distanz besser aus, als auf dem Foto.
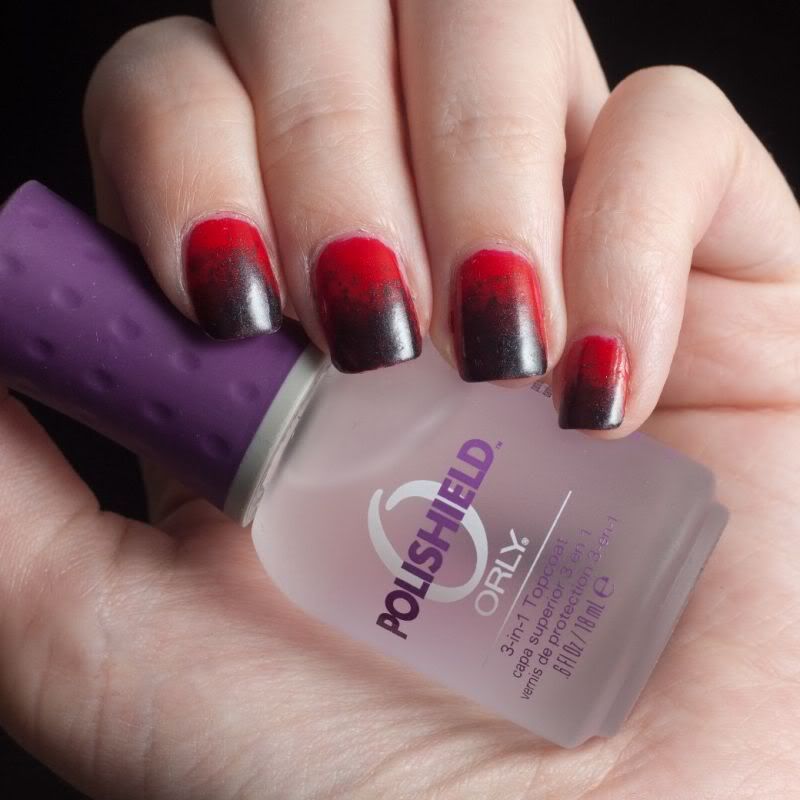
Basecoat is Orly Bonder (are you tired of me saying that, yet? ;) ), the two polishes are from Essence, but I don't know the names, both their lables came off. It's a bright, fireengine red and a shimmery black from the Colour and Go line. Topcoat is Polishield.
--
Unterlack ist Orly Bonder (Na, geht es euch schon auf den Keks? :) ), die zwei Lacke sind beide von Essence, die Namen kann ich euch allerdings nicht sagen, da die Lables abgegangen sind. Es ist ein helles feuerrot und ein schimmerdes Schwarz aus der Colour and Go Linie. Überlack ist Polishield.
--
Ich habe die Schwamm-Technik ausprobiert und bin eigentlich ganz zufrieden, für einen ersten Versuch. Es sieht aus ein bisschen Distanz besser aus, als auf dem Foto.
Basecoat is Orly Bonder (are you tired of me saying that, yet? ;) ), the two polishes are from Essence, but I don't know the names, both their lables came off. It's a bright, fireengine red and a shimmery black from the Colour and Go line. Topcoat is Polishield.
--
Unterlack ist Orly Bonder (Na, geht es euch schon auf den Keks? :) ), die zwei Lacke sind beide von Essence, die Namen kann ich euch allerdings nicht sagen, da die Lables abgegangen sind. Es ist ein helles feuerrot und ein schimmerdes Schwarz aus der Colour and Go Linie. Überlack ist Polishield.
Samstag, 23. April 2011
Orly Shine
Holy crap, this polish is reflective! It's probably as reflective as any polish will ever get. It doesn't render a mirror obsolete, but it's seriously gorgeous!
--
Heilige Kuh, dieser Lack ist verdammt reflektierend. Besser gehts wahrscheinlich einfach nicht. Es ist nicht so, dass ihr keinen Spiegel mehr braucht, aber es ist einfach wunderbar.
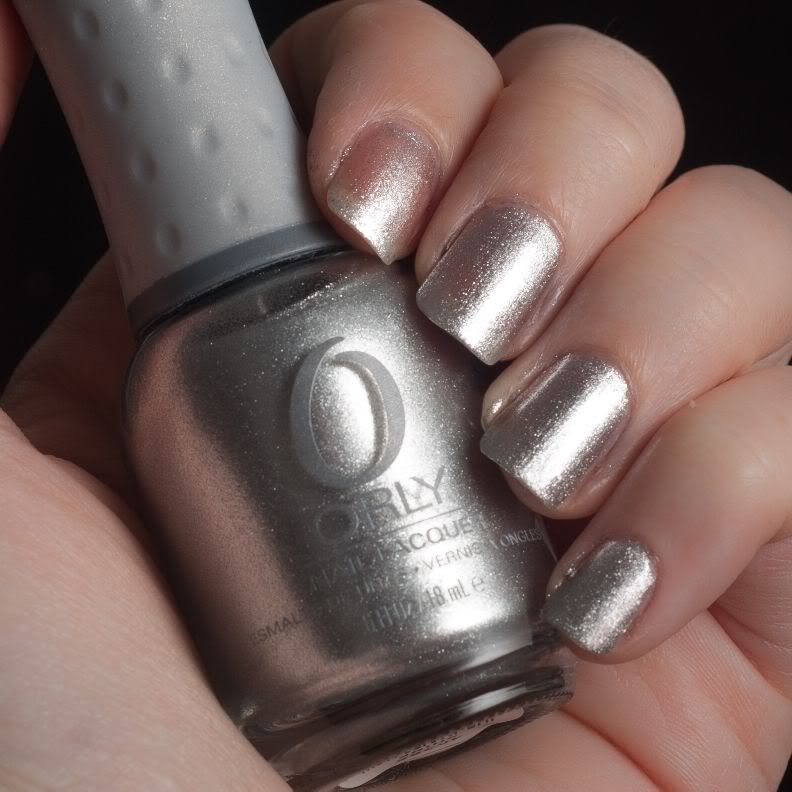
Pointer has one coat, middle two, ring three and pinky four. Three coats is enough, four is only neccessary if you want to be on the VERY safe side.
I ordered some nail foils from dollarnailart.com and we'll see, if they get even more Minx-like.
--
Zeige Finger hat eine Schicht, Mittel zwei, Ring drei und kleiner Finger vier. Drei Schichten reichen, vier müssen nur dann sein, wenn man wirklich sicher gehen will, dass auch bei hellem Licht nichts durchschimmert.
Ich habe ein paar Nail Foils von dollarnailart.com bestellt und wir werden sehen, ob die noch mehr "Minx-mässig" sind.
--
Heilige Kuh, dieser Lack ist verdammt reflektierend. Besser gehts wahrscheinlich einfach nicht. Es ist nicht so, dass ihr keinen Spiegel mehr braucht, aber es ist einfach wunderbar.
Pointer has one coat, middle two, ring three and pinky four. Three coats is enough, four is only neccessary if you want to be on the VERY safe side.
I ordered some nail foils from dollarnailart.com and we'll see, if they get even more Minx-like.
--
Zeige Finger hat eine Schicht, Mittel zwei, Ring drei und kleiner Finger vier. Drei Schichten reichen, vier müssen nur dann sein, wenn man wirklich sicher gehen will, dass auch bei hellem Licht nichts durchschimmert.
Ich habe ein paar Nail Foils von dollarnailart.com bestellt und wir werden sehen, ob die noch mehr "Minx-mässig" sind.
Freitag, 22. April 2011
NOTD April, 22th 2011
After doing the Product Battle for the matte topcoats, I wanted to do matte nails again.
So, I pulled out a few things and started layering:
--
Nachdem ich den Product Battle für die mattierenden Überlacke gemacht habe, wollte ich mal wieder was mattes auf den Nägel.
Also habe ich einfach ein paar Sachen aus meinen Kisten gezogen und angefangen zu schichten:
Basecoat: Orly Bonder, two coats of OPI Ink, one coat of my torquoise glimmer franken, topcoat: Orly Polishield, matte topcoat: Essie Matte About You.
--
Unterlack: Orly Bonder, zwei Schichten OPI Ink, eine Schicht von meinem türkisen Glimmer Franken, Überlack: Orly Polishield, matter Überlack: Essie Matte About You.
Donnerstag, 21. April 2011
Purples
Third installment of my collection-posts. These posts are references, please feel free to request reviews, comparisons and swatches of any of the colours shown.
I always try my best to make the pictures as colour acurate as possible on my calibrated monitor, but keep in mind, that diffrent monitors will display colours diffrently. I can not guarantee, that your monitor will show you the colours as I see them. I am sorry for that, but there is nothing I can do.
Today: Purples
--
Hier ist die dritte Ausgabe meiner Sammlungs-posts. Diese Posts sind als Referenz zu verstehen, ihr könnt gerne Reviews, Vergleiche und Swatches von allen gezeigten Farben anfordern.
Ich sorge immer dafür, dass die Farben auf meinem kalibrierten Monitor so akurat wie möglich erscheinen, aber ihr müsst euch darüber im Klaren sein, dass verschiedene Monitore Farben unterschiedlich darstellen. Ich kann euch keine Garantie geben, dass euer Monitor die Farben genau so anzeigt, wie ich sie hier sehe. Das tut mir wirklich leid, aber ich kann nicht mehr machen, als eben die Bilder so gut wie möglich aufzunehmen und zu bearbeiten.
Für Heute: Lila
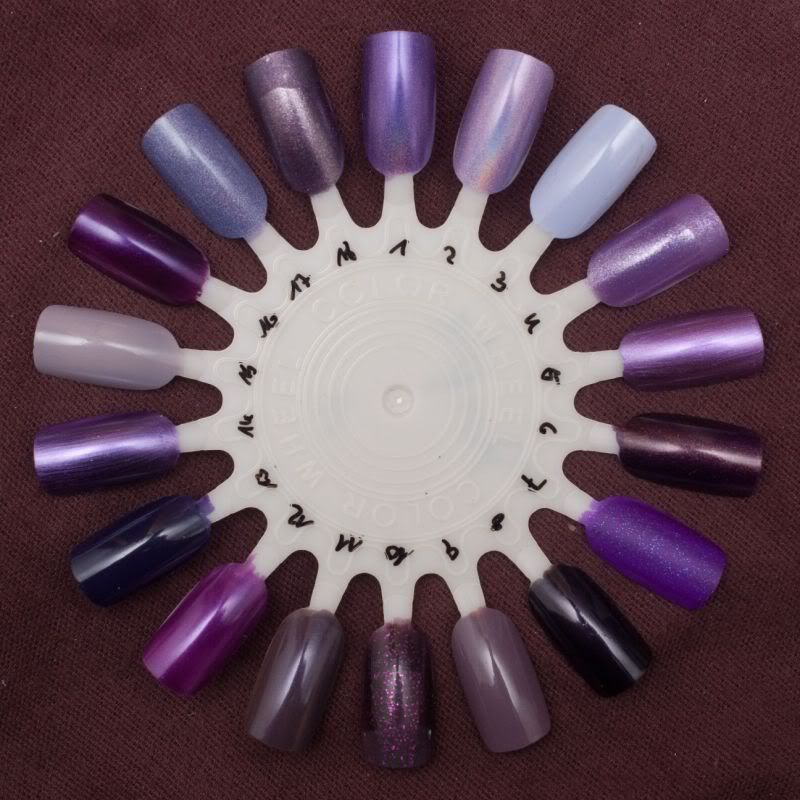 1: ChG LOL
2: ChG IDK
3: ChG Agent Lavender
4: ChG Grape Juice with matte tip
5: ChG Harmony
6: ChG Side Saddle
7: ChG Flying Dragon
8: ChG Midnight Ride
9: ChG Below Deck
10 ChG Mummy May I with matte tip
11: Alessandro Hypnotic
12: Alessandro 273
13: Alessandro 271
14: Kron Iris
15: Manhattan 67C
16: Catrice Poison Me, Poison You
17: Catrice Dirty Berry
18: Catrice Purplized with matte tip
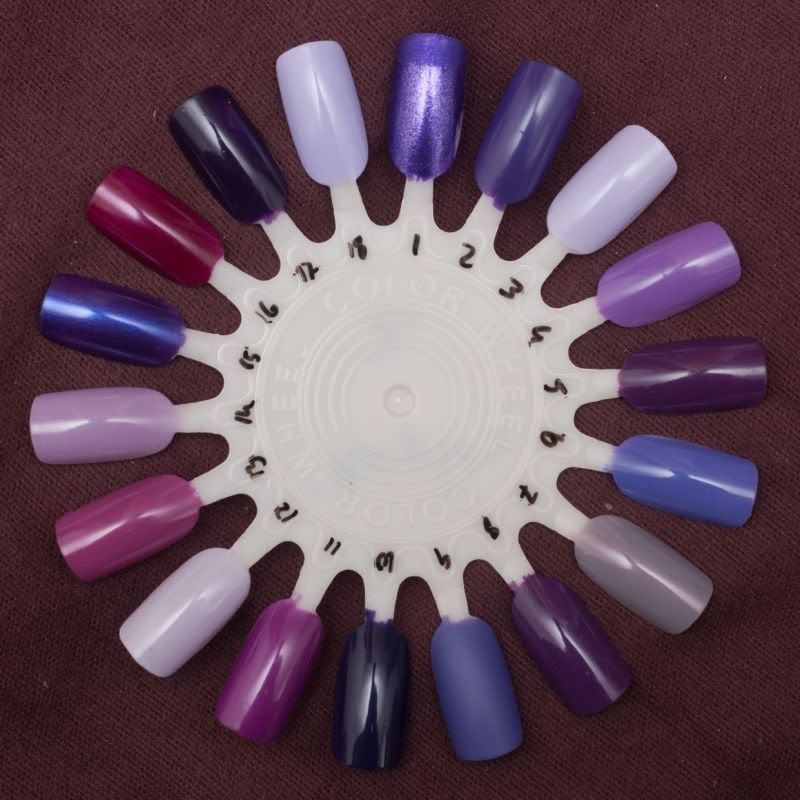 1: Catrice Forgett me not with matte tip
2: Catrice Purposely Purple
3: Catrice Lavenderlicious
4: Catrice Lucky in Lilac
5: Catrice Plum Play with me
6: P2 Poetic 2011
7: P2 Elegant 2010
8: P2 Chic
9: Orly Purple pleather
10: Orly Wild Wisteria
11: Essence (don't know the name, sorry)
12: Essence Dress For A Moment
13: Essence Go Wild
14: Essence No More Drama
15: Essence Rock it, Baby
16: Essence Hypnotic Poison
17: Essence Pruple Cherry
18: Essence Found my Love
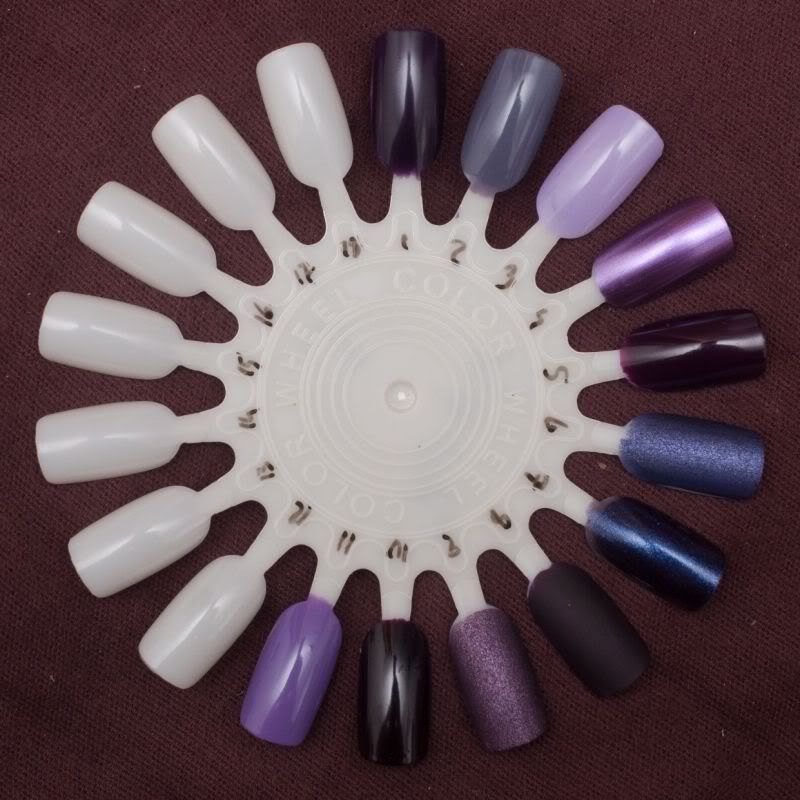 1: Essence Thelma
2: Artdeco Ceramic 126
3: Fairwind Violet Orchid
4: SH Royal Purple Chrome
5: Basic Purple
6: OPI Ink! Suede
7: OPI INK!
8: OPI Lincoln Park After Dark Matte
9: OPI Lincoln Park After Dark Suede
10: OPI Lincoln Park After Dark
11: OPI A Grape Fit
I always try my best to make the pictures as colour acurate as possible on my calibrated monitor, but keep in mind, that diffrent monitors will display colours diffrently. I can not guarantee, that your monitor will show you the colours as I see them. I am sorry for that, but there is nothing I can do.
Today: Purples
--
Hier ist die dritte Ausgabe meiner Sammlungs-posts. Diese Posts sind als Referenz zu verstehen, ihr könnt gerne Reviews, Vergleiche und Swatches von allen gezeigten Farben anfordern.
Ich sorge immer dafür, dass die Farben auf meinem kalibrierten Monitor so akurat wie möglich erscheinen, aber ihr müsst euch darüber im Klaren sein, dass verschiedene Monitore Farben unterschiedlich darstellen. Ich kann euch keine Garantie geben, dass euer Monitor die Farben genau so anzeigt, wie ich sie hier sehe. Das tut mir wirklich leid, aber ich kann nicht mehr machen, als eben die Bilder so gut wie möglich aufzunehmen und zu bearbeiten.
Für Heute: Lila
1: ChG LOL2: ChG IDK
3: ChG Agent Lavender
4: ChG Grape Juice with matte tip
5: ChG Harmony
6: ChG Side Saddle
7: ChG Flying Dragon
8: ChG Midnight Ride
9: ChG Below Deck
10 ChG Mummy May I with matte tip
11: Alessandro Hypnotic
12: Alessandro 273
13: Alessandro 271
14: Kron Iris
15: Manhattan 67C
16: Catrice Poison Me, Poison You
17: Catrice Dirty Berry
18: Catrice Purplized with matte tip
1: Catrice Forgett me not with matte tip2: Catrice Purposely Purple
3: Catrice Lavenderlicious
4: Catrice Lucky in Lilac
5: Catrice Plum Play with me
6: P2 Poetic 2011
7: P2 Elegant 2010
8: P2 Chic
9: Orly Purple pleather
10: Orly Wild Wisteria
11: Essence (don't know the name, sorry)
12: Essence Dress For A Moment
13: Essence Go Wild
14: Essence No More Drama
15: Essence Rock it, Baby
16: Essence Hypnotic Poison
17: Essence Pruple Cherry
18: Essence Found my Love
1: Essence Thelma2: Artdeco Ceramic 126
3: Fairwind Violet Orchid
4: SH Royal Purple Chrome
5: Basic Purple
6: OPI Ink! Suede
7: OPI INK!
8: OPI Lincoln Park After Dark Matte
9: OPI Lincoln Park After Dark Suede
10: OPI Lincoln Park After Dark
11: OPI A Grape Fit
Mittwoch, 20. April 2011
OPI Shimmer and Simmer
OPI makes very good glitter polishes. They are all densely packed and have a great depth. Three coats are enough to get good coverage, but removal is still a pain in the booty.
I felt like something sparkly today and whipped out my Shimmer and Simmer from the Burlesque collection. It's a clear base with dominant blue and silver glitter, mixed with a bit of gold and pink.
--
OPI stellt wirklich fantastische Glitter-Lacke her. Sie sind alle voll gepackt mit Glitterpartikeln und haben eine erstaunliche Tiefe. Drei Schichten sind genug, allerdings ist das Ablackieren immernoch eine Qual.
Heute habe ich mich nach etwas glitzrigem gesehnt und gleich mal mein Shimmer and Simmer aus der Burlesque Kollektion ausgegraben. Die Basis ist klar und hat hauptsächlich blauen und silbernen Glitter, gemischt mit ein bisschen gold und Pink.
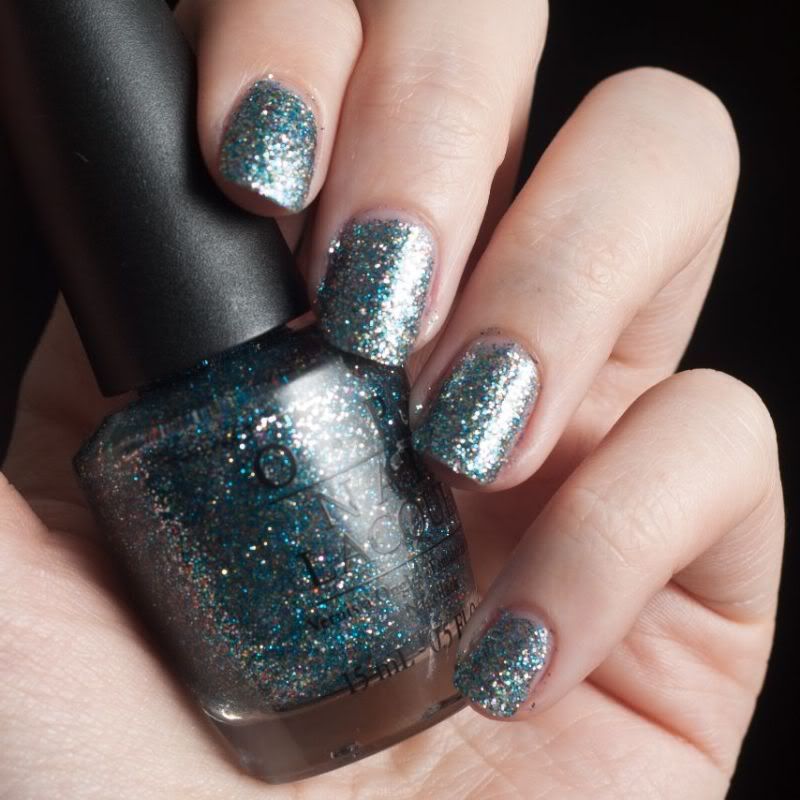
Three coats of OPI Shimmer and Simmer, basecoat is Gelous, topcoat Essence Better than Gel Nails Top Sealer.
I am so not looking forward to removal, but it is sparkle-heaven.
--
Drei Schichten OPI Shimmer and Simmer, Unterlack ist Gelous, Überlack Essence Better than Gel Nails Top Sealer.
Ich möchte noch gar nicht ans Ablackieren denken, aber dieser Lack kommt direkt aus dem Glitter-Himmel.
I felt like something sparkly today and whipped out my Shimmer and Simmer from the Burlesque collection. It's a clear base with dominant blue and silver glitter, mixed with a bit of gold and pink.
--
OPI stellt wirklich fantastische Glitter-Lacke her. Sie sind alle voll gepackt mit Glitterpartikeln und haben eine erstaunliche Tiefe. Drei Schichten sind genug, allerdings ist das Ablackieren immernoch eine Qual.
Heute habe ich mich nach etwas glitzrigem gesehnt und gleich mal mein Shimmer and Simmer aus der Burlesque Kollektion ausgegraben. Die Basis ist klar und hat hauptsächlich blauen und silbernen Glitter, gemischt mit ein bisschen gold und Pink.
Three coats of OPI Shimmer and Simmer, basecoat is Gelous, topcoat Essence Better than Gel Nails Top Sealer.
I am so not looking forward to removal, but it is sparkle-heaven.
--
Drei Schichten OPI Shimmer and Simmer, Unterlack ist Gelous, Überlack Essence Better than Gel Nails Top Sealer.
Ich möchte noch gar nicht ans Ablackieren denken, aber dieser Lack kommt direkt aus dem Glitter-Himmel.
Dienstag, 19. April 2011
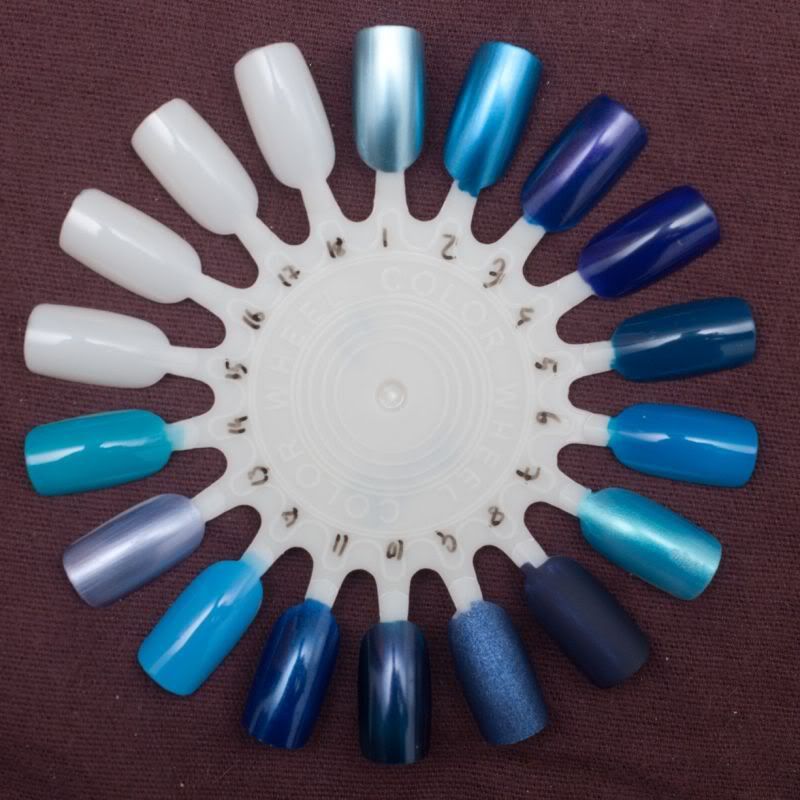
Blues
Sooo, I am done photographing all my nail wheels with my current polishes. I'll try to do one colourfamily per day. These posts are references, please feel free to request reviews, comparisons and swatches of any of the colours shown.
I always try my best to make the pictures as colour acurate as possible on my calibrated monitor, but keep in mind, that diffrent monitors will display colours diffrently. I can not guarantee, that your monitor will show you the colours as I see them. I am sorry for that, but there is nothing I can do.
Up for today, my other favorite colours for nail polish: Blue.
--
Sooo, ich habe endlich alle meine Nail Wheels mit meinen aktuellen Lacken fotografiert. Ich werde versuchen jeden Tag eine Farbfamilie hochzuladen. Diese Posts sind als Referenz zu verstehen, ihr könnt gerne Reviews, Vergleiche und Swatches von allen gezeigten Farben anfordern.
Ich sorge immer dafür, dass die Farben auf meinem kalibrierten Monitor so akurat wie möglich erscheinen, aber ihr müsst euch darüber im Klaren sein, dass verschiedene Monitore Farben unterschiedlich darstellen. Ich kann euch keine Garantie geben, dass euer Monitor die Farben genau so anzeigt, wie ich sie hier sehe. Das tut mir wirklich leid, aber ich kann nicht mehr machen, als eben die Bilder so gut wie möglich aufzunehmen und zu bearbeiten.
Heute meine zweite Lieblingsfarben, wenn es um Nagellack geht: Blau.
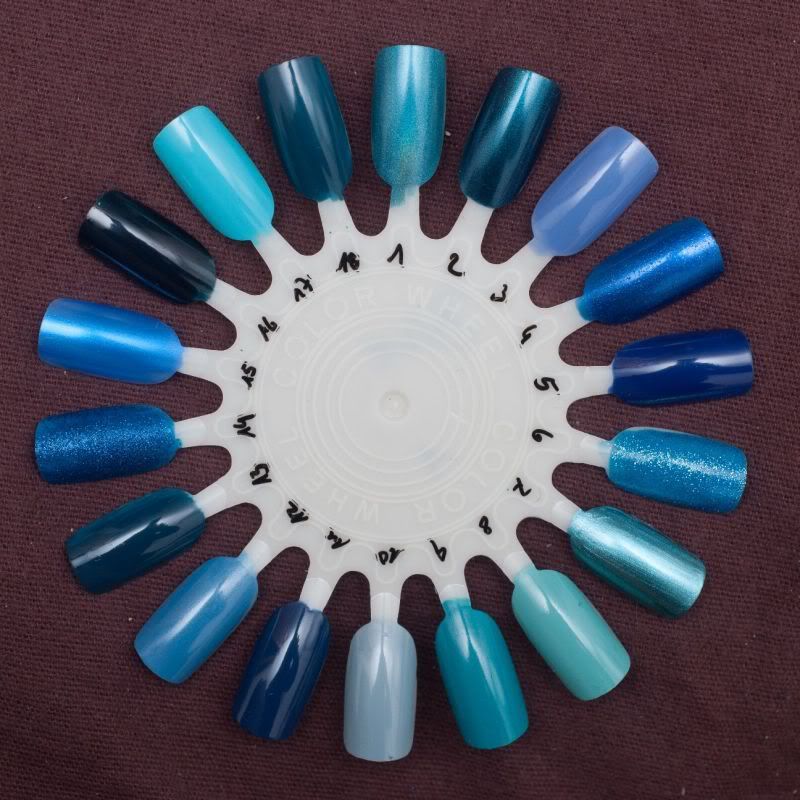 1: ChG DV8
2: ChG Rodeo Diva
3: ChG Secret Periwinkle
4: ChG Eyes like Saqhires
5: ChG Bermuda Breakaway
6: ChG Dorothy Who?
7: ChG Adore
8: ChG For Audrey
9: ChG Custom Kicks
10: ChG Sea Spray
11: ChG First Mate
12: Essie Coat Azure
13: Anny Dancing in the Rain
14: Nubar Night Sparkle
15: Debby 79
16: Alessandro 263
17: Manhattan 78D
18: Manhattan 78T
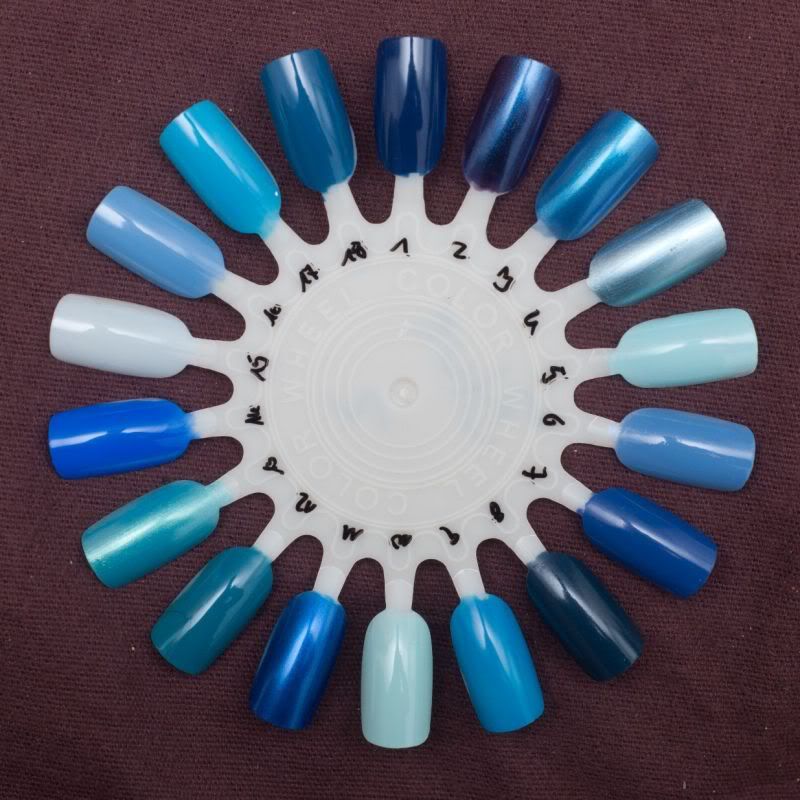 1: Manhattan 710G
2: Kron Viola
3: Kron Wölkchen
4: Kron Nordpol
5: Catrice Am I Blue or Am I Green
6: Catrice Up in the air
7: Catrice Poolparty at Night
8: Catrice Hip Queen Wear Blue Jeans
9: Catrice Blue Cara Ciao
10: P2 Who Cares 2011
11: P2 So Cool 2011
12: P2 Funky 2011
13: P2 So Cool 2010
14: P2 Gigantic 2010
15: P2 Beeing in Heaven 2010
16: P2 Charming 2011
17: Orly Blue Colar
18: Orly Calypso Breeze
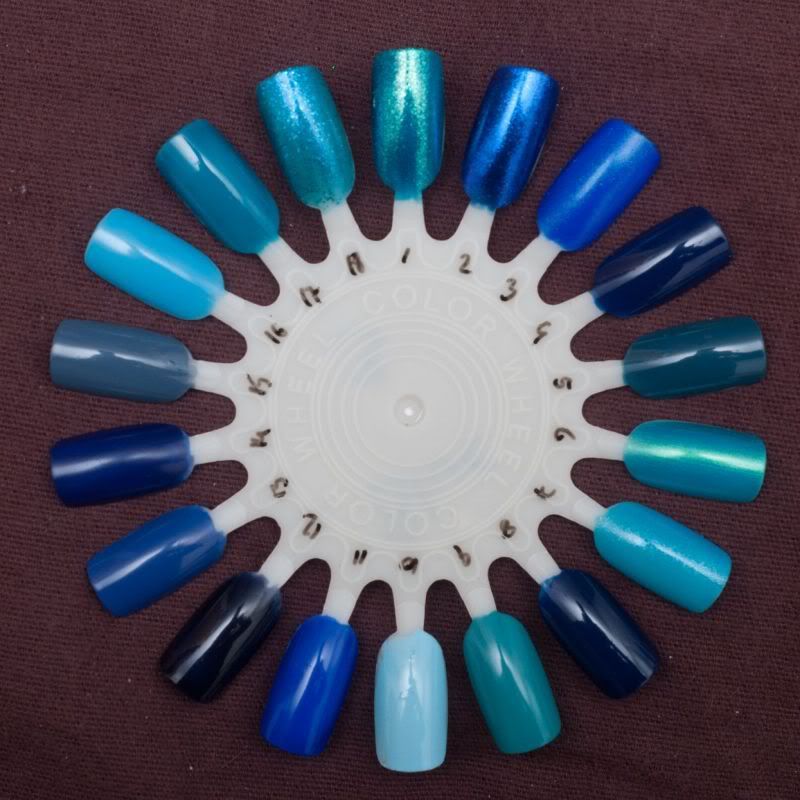 1: Orly Hayleys Comet
2: Orly Lunar Eclipse
3: Orly Royal Navy
4: Orly La Playa
5: Orly Saphire Silk
6: Essence Out of my Mind
7: Essence Poolparty
8: Essence Just Rock it
9: Essence Trying to be Cool
10: Essence Fall for me
11: Essence Cool and the Gang
12: Essence Midnight Rocker
13: Essence Chuck
14: Essence Chacalaca
15: Artdeco Ceramic 125
16: Flormar N002
17: Fairwind Teal
18: Del Sol Rockstar
 1: SH Aqua Chrome
2: SH Aquamarine Chrome
3: Rimmel Blue Me Away
4: Rimmel Blue My Mind
5: Essence My Boyfriends Jeans
6: Essence Forever Mine
7: MNY 657
8: OPI Russian Navy Matte
9: OPI Russian Navy Suede
10: OPI Russian Navy
11: OPI Yoga-ta Get This Blue
12: OPI No Room for the Blues
13: OPI Sahara Saphire
14: Anny Pool Girl
I always try my best to make the pictures as colour acurate as possible on my calibrated monitor, but keep in mind, that diffrent monitors will display colours diffrently. I can not guarantee, that your monitor will show you the colours as I see them. I am sorry for that, but there is nothing I can do.
Up for today, my other favorite colours for nail polish: Blue.
--
Sooo, ich habe endlich alle meine Nail Wheels mit meinen aktuellen Lacken fotografiert. Ich werde versuchen jeden Tag eine Farbfamilie hochzuladen. Diese Posts sind als Referenz zu verstehen, ihr könnt gerne Reviews, Vergleiche und Swatches von allen gezeigten Farben anfordern.
Ich sorge immer dafür, dass die Farben auf meinem kalibrierten Monitor so akurat wie möglich erscheinen, aber ihr müsst euch darüber im Klaren sein, dass verschiedene Monitore Farben unterschiedlich darstellen. Ich kann euch keine Garantie geben, dass euer Monitor die Farben genau so anzeigt, wie ich sie hier sehe. Das tut mir wirklich leid, aber ich kann nicht mehr machen, als eben die Bilder so gut wie möglich aufzunehmen und zu bearbeiten.
Heute meine zweite Lieblingsfarben, wenn es um Nagellack geht: Blau.
1: ChG DV82: ChG Rodeo Diva
3: ChG Secret Periwinkle
4: ChG Eyes like Saqhires
5: ChG Bermuda Breakaway
6: ChG Dorothy Who?
7: ChG Adore
8: ChG For Audrey
9: ChG Custom Kicks
10: ChG Sea Spray
11: ChG First Mate
12: Essie Coat Azure
13: Anny Dancing in the Rain
14: Nubar Night Sparkle
15: Debby 79
16: Alessandro 263
17: Manhattan 78D
18: Manhattan 78T
1: Manhattan 710G2: Kron Viola
3: Kron Wölkchen
4: Kron Nordpol
5: Catrice Am I Blue or Am I Green
6: Catrice Up in the air
7: Catrice Poolparty at Night
8: Catrice Hip Queen Wear Blue Jeans
9: Catrice Blue Cara Ciao
10: P2 Who Cares 2011
11: P2 So Cool 2011
12: P2 Funky 2011
13: P2 So Cool 2010
14: P2 Gigantic 2010
15: P2 Beeing in Heaven 2010
16: P2 Charming 2011
17: Orly Blue Colar
18: Orly Calypso Breeze
1: Orly Hayleys Comet2: Orly Lunar Eclipse
3: Orly Royal Navy
4: Orly La Playa
5: Orly Saphire Silk
6: Essence Out of my Mind
7: Essence Poolparty
8: Essence Just Rock it
9: Essence Trying to be Cool
10: Essence Fall for me
11: Essence Cool and the Gang
12: Essence Midnight Rocker
13: Essence Chuck
14: Essence Chacalaca
15: Artdeco Ceramic 125
16: Flormar N002
17: Fairwind Teal
18: Del Sol Rockstar
2: SH Aquamarine Chrome
3: Rimmel Blue Me Away
4: Rimmel Blue My Mind
5: Essence My Boyfriends Jeans
6: Essence Forever Mine
7: MNY 657
8: OPI Russian Navy Matte
9: OPI Russian Navy Suede
10: OPI Russian Navy
11: OPI Yoga-ta Get This Blue
12: OPI No Room for the Blues
13: OPI Sahara Saphire
14: Anny Pool Girl
Product Battle: Matte Topcoats
I love matte topcoats. Seriously! Especially on glittery or glass-fleck polishes. It gives a realy cool effect. So, naturally, I have a bunch of them. 4 to be exact. Matt Topcoat by Essence, Catrice Nail Experts Matt Topcoat (those two are identical! Made by the same manufacturer, wear the same, look the same ... I used the Essence for the test), Manhattan Pro Mat Top Coat and of course Essie Matte About You.
--
Ich liebe Matt Topcats. Wirklich! Besonders mit Glitter oder Glass-Fleck Lacken erzeugen sie einfach einen sehr coolen Effekt. Es ist also nicht überraschend, dass ich eine ganze Horde besitze, 4 Stück um genau zu sein. Den Essence Matt Topcoat, den Catrice Nail Experts Matt Topcoat (diese beiden sind identisch! Sie werden vom selben Hersteller gemacht, tragen sich genau gleich, sehen gleich aus ... Ich habe für diesen Test den Essence Topcoat genommen), Manhattan Pro Mat Top Coat und natürlich Essie Matte About You.
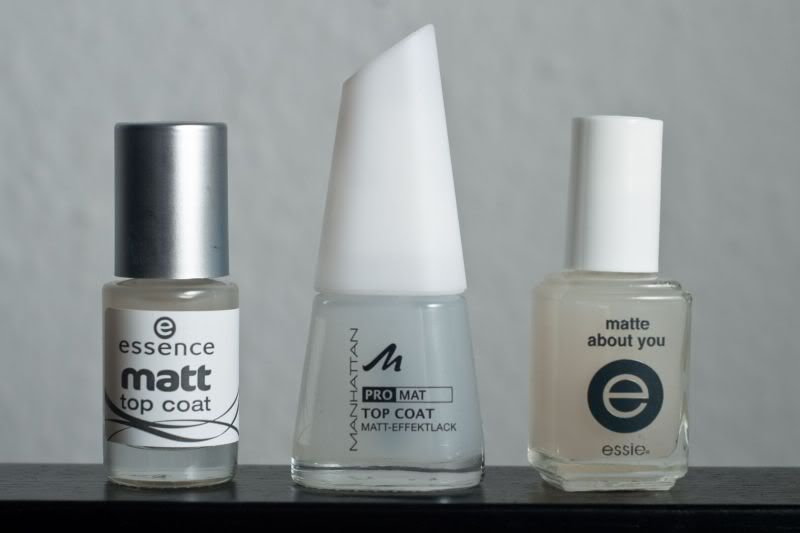
The prices vary immensely between brands! Essence is 1,79€ (about $2,55) for 8ml, Catrice 2,50€ ($3,55) for 12ml, Manhattan 2,50€ for 11ml and Essie 13,50€ (prices in the US vary, I've seen it around $6) for 15ml. Is there such a big diffrence in performance, that it justifies the price diffrence?
Let's look at our contestants. Essence (and with that Catrice, too) and Essie are both a milky off-white colour, while the Manhattan is a little more translucent and pretty much pure white.
The brushes on the Essence, Catrice and Essie are all the usuall round ones, no problems in application with either, though if you want to get nitpicky, the Essie brush is the best of those three. The Manhattan brush is wider and flat and I find the best brush of all the contestants. Though, brushes are not that important with topcoats, I find, as long as they WORK!
As my testpolish I applied Catrice Purplized to four nails.
--
Die Preise unterscheiden sich gewaltig! Essence kostet 1,79€ für 8ml, Catrice 2,50€ für 12ml, Manhattan 2,50€ für 11ml und Essie 13,50€ bei Douglas für 15ml. Gibt es wirklich so einen riesen Unterschied in der Qualität, dass sich dieser Unterschied im Preis rechtfertigt?
Lasst uns einen Blick auf die Bewerber werfen: Essence (und so auch der Catrice) und Essie sind beide milchig und creme-farben, während der Manhattan mehr durchscheinend und ganz weiss ist. Die Pinselchen bei Essence, Catrice und Essie sind alle klassisch rund gebunden und funktionieren gut. Wenn ich Haare spalten wollte würde ich sagen, der Essie Pinsel ist der Beste von diesen dreien. Der Manhattan Pinsel ist flach und etwas breiter und funktioniert meines Erachtens von allen vieren am besten, allerdings sind Pinsel bei Überlacken jetzt auch nicht SO wichtig. Hauptsache sie funktionieren.
Als Testlack habe ich Catrice Purplized genommen.
 In order of appearance: Essence, Manhattan, Essie, without topcoat.
The Essence goes on very nice and even and leaves the Nail very matte. It does not change the colour too terribly much. It dries the polish underneath quicker, which is a plus!
On me, it stayed reasonably matt for about two days, after that it chipped and was very satin looking.
The Manhattan has a good application, but is more satin looking, than the rest. It changes the colour the least, but it does NOT help to dry the polish, that is, why that nail has a good dent in it.
It stayed on well, but it was pretty shiny by the end of the first day. Chipping was at a minimum.
Essie is the mattest (if that is even a word) of the bunch and it realy dried the polish underneath lightening fast. It lightened the colour a good bit, sadly and took away more spakle in the polish, than the others. But, it stayed matt and pretty much intact for a good while. Matte About You tends to get white spots after a while though, which I do not have any idea how to avoid.
So, which one is THE BEST? Well, quality wise, Essie all the way! Here in germany, it is far to expensive, though. If you are looking for a cheap, but good alternative, it's either Catrice (which is the cheapest, when it comes down to $ per ml) or Essence.
--
In der Reihenfolge: Essence, Manhattan, Essie, ohne Topcoat.
Der Essence Topcoat lässt sich gut auftragen und mattiert die Nägel wirklich hervorragend. Es verändert die Farbe des Lackes darunter nur minimal und hilft den Farblack schneller zu trocknen.
Bei mir bleibt der Topcoat relativ matt für ca. 2 Tage, danach splittert er doch sehr und sieht eher satiniert aus.
Der Manhattan Lack hat, dank dem Pinsel den besten Auftrag, ist aber nicht richtig matt, eher satiniert. Es verändert die Farbe des darunterliegenden Lackes am wenigsten von den Kandidaten, aber beim Trocknen hilft er keinen Deut, weshalb ich auf dem Foto in diesem Nagel auch eine mächtige Delle habe.
Der Lack hält ganz gut, wurde aber sehr schnell wieder ziemlich glänzend.
Essie Matte About You ist der matteste von allen und trocknet den Lack darunter wirklich blitzschnell. Die Farbe des Lackes darunter wird allerdings ein gutes bisschen aufgehellt und es beeinträchtigt den Schimmer und Glitzer sehr. Dieser Lack blieb am längsten matt und splitterfrei! Nach einer Weile hat Matte About You die schlechte Angewohnheit weisse Klümpchen zu bilden, die dann auch auf dem Nagel zu sehen sind. Bisher habe ich noch nicht rausgefunden, wie man das verhindern kann.
Welcher ist also der BESTE Matt Top Coat? Schwer zu sagen. Der qualitativ beste ist Essie, deffinitiv! Allerdings ist der deutsche Preis einfach zu hoch. Wer es sich leisten kann, oder ohnehin aus Amerkia Lacke beziehen kann, sollte ihn sich allerdings doch anschauen. Für alle anderen Empfehle ich den Catrice Matt Topcoat, der ist vom Preis Leistungs Verhältnis der beste.
--
Ich liebe Matt Topcats. Wirklich! Besonders mit Glitter oder Glass-Fleck Lacken erzeugen sie einfach einen sehr coolen Effekt. Es ist also nicht überraschend, dass ich eine ganze Horde besitze, 4 Stück um genau zu sein. Den Essence Matt Topcoat, den Catrice Nail Experts Matt Topcoat (diese beiden sind identisch! Sie werden vom selben Hersteller gemacht, tragen sich genau gleich, sehen gleich aus ... Ich habe für diesen Test den Essence Topcoat genommen), Manhattan Pro Mat Top Coat und natürlich Essie Matte About You.
The prices vary immensely between brands! Essence is 1,79€ (about $2,55) for 8ml, Catrice 2,50€ ($3,55) for 12ml, Manhattan 2,50€ for 11ml and Essie 13,50€ (prices in the US vary, I've seen it around $6) for 15ml. Is there such a big diffrence in performance, that it justifies the price diffrence?
Let's look at our contestants. Essence (and with that Catrice, too) and Essie are both a milky off-white colour, while the Manhattan is a little more translucent and pretty much pure white.
The brushes on the Essence, Catrice and Essie are all the usuall round ones, no problems in application with either, though if you want to get nitpicky, the Essie brush is the best of those three. The Manhattan brush is wider and flat and I find the best brush of all the contestants. Though, brushes are not that important with topcoats, I find, as long as they WORK!
As my testpolish I applied Catrice Purplized to four nails.
--
Die Preise unterscheiden sich gewaltig! Essence kostet 1,79€ für 8ml, Catrice 2,50€ für 12ml, Manhattan 2,50€ für 11ml und Essie 13,50€ bei Douglas für 15ml. Gibt es wirklich so einen riesen Unterschied in der Qualität, dass sich dieser Unterschied im Preis rechtfertigt?
Lasst uns einen Blick auf die Bewerber werfen: Essence (und so auch der Catrice) und Essie sind beide milchig und creme-farben, während der Manhattan mehr durchscheinend und ganz weiss ist. Die Pinselchen bei Essence, Catrice und Essie sind alle klassisch rund gebunden und funktionieren gut. Wenn ich Haare spalten wollte würde ich sagen, der Essie Pinsel ist der Beste von diesen dreien. Der Manhattan Pinsel ist flach und etwas breiter und funktioniert meines Erachtens von allen vieren am besten, allerdings sind Pinsel bei Überlacken jetzt auch nicht SO wichtig. Hauptsache sie funktionieren.
Als Testlack habe ich Catrice Purplized genommen.
The Essence goes on very nice and even and leaves the Nail very matte. It does not change the colour too terribly much. It dries the polish underneath quicker, which is a plus!
On me, it stayed reasonably matt for about two days, after that it chipped and was very satin looking.
The Manhattan has a good application, but is more satin looking, than the rest. It changes the colour the least, but it does NOT help to dry the polish, that is, why that nail has a good dent in it.
It stayed on well, but it was pretty shiny by the end of the first day. Chipping was at a minimum.
Essie is the mattest (if that is even a word) of the bunch and it realy dried the polish underneath lightening fast. It lightened the colour a good bit, sadly and took away more spakle in the polish, than the others. But, it stayed matt and pretty much intact for a good while. Matte About You tends to get white spots after a while though, which I do not have any idea how to avoid.
So, which one is THE BEST? Well, quality wise, Essie all the way! Here in germany, it is far to expensive, though. If you are looking for a cheap, but good alternative, it's either Catrice (which is the cheapest, when it comes down to $ per ml) or Essence.
--
In der Reihenfolge: Essence, Manhattan, Essie, ohne Topcoat.
Der Essence Topcoat lässt sich gut auftragen und mattiert die Nägel wirklich hervorragend. Es verändert die Farbe des Lackes darunter nur minimal und hilft den Farblack schneller zu trocknen.
Bei mir bleibt der Topcoat relativ matt für ca. 2 Tage, danach splittert er doch sehr und sieht eher satiniert aus.
Der Manhattan Lack hat, dank dem Pinsel den besten Auftrag, ist aber nicht richtig matt, eher satiniert. Es verändert die Farbe des darunterliegenden Lackes am wenigsten von den Kandidaten, aber beim Trocknen hilft er keinen Deut, weshalb ich auf dem Foto in diesem Nagel auch eine mächtige Delle habe.
Der Lack hält ganz gut, wurde aber sehr schnell wieder ziemlich glänzend.
Essie Matte About You ist der matteste von allen und trocknet den Lack darunter wirklich blitzschnell. Die Farbe des Lackes darunter wird allerdings ein gutes bisschen aufgehellt und es beeinträchtigt den Schimmer und Glitzer sehr. Dieser Lack blieb am längsten matt und splitterfrei! Nach einer Weile hat Matte About You die schlechte Angewohnheit weisse Klümpchen zu bilden, die dann auch auf dem Nagel zu sehen sind. Bisher habe ich noch nicht rausgefunden, wie man das verhindern kann.
Welcher ist also der BESTE Matt Top Coat? Schwer zu sagen. Der qualitativ beste ist Essie, deffinitiv! Allerdings ist der deutsche Preis einfach zu hoch. Wer es sich leisten kann, oder ohnehin aus Amerkia Lacke beziehen kann, sollte ihn sich allerdings doch anschauen. Für alle anderen Empfehle ich den Catrice Matt Topcoat, der ist vom Preis Leistungs Verhältnis der beste.
Montag, 18. April 2011
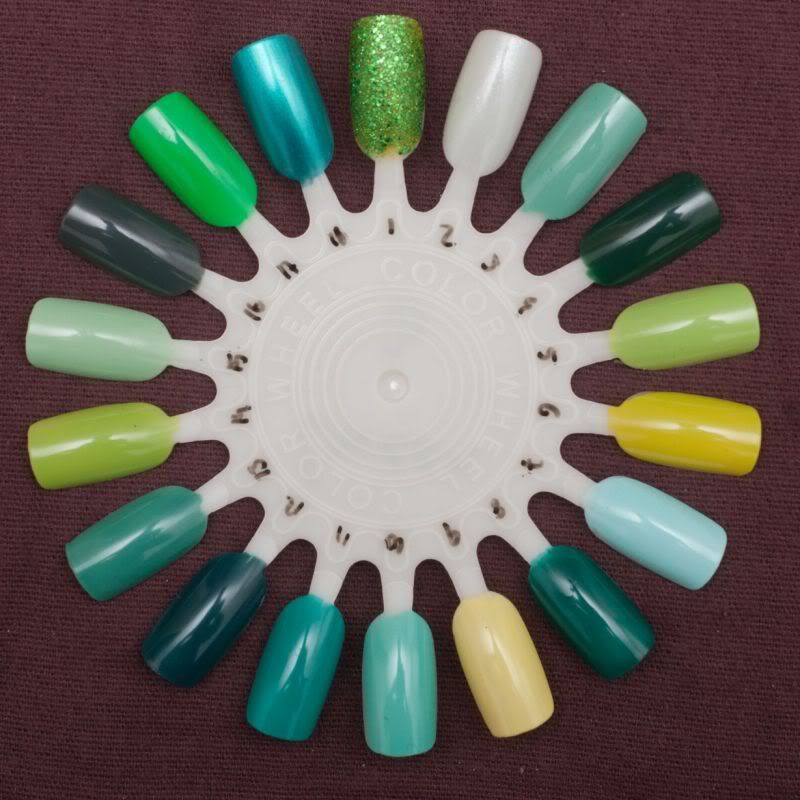
Greens
Sooo, I am done photographing all my nail wheels with my current polishes. I'll try to do one colourfamily per day. These posts are references, please feel free to request reviews, comparisons and swatches of any of the colours shown.
I always try my best to make the pictures as colour acurate as possible on my calibrated monitor, but keep in mind, that diffrent monitors will display colours diffrently. I can not guarantee, that your monitor will show you the colours as I see them. I am sorry for that, but there is nothing I can do.
Up for today, one of my favorite colours for nail polish: GREEN.
--
Sooo, ich habe endlich alle meine Nail Wheels mit meinen aktuellen Lacken fotografiert. Ich werde versuchen jeden Tag eine Farbfamilie hochzuladen. Diese Posts sind als Referenz zu verstehen, ihr könnt gerne Reviews, Vergleiche und Swatches von allen gezeigten Farben anfordern.
Ich sorge immer dafür, dass die Farben auf meinem kalibrierten Monitor so akurat wie möglich erscheinen, aber ihr müsst euch darüber im Klaren sein, dass verschiedene Monitore Farben unterschiedlich darstellen. Ich kann euch keine Garantie geben, dass euer Monitor die Farben genau so anzeigt, wie ich sie hier sehe. Das tut mir wirklich leid, aber ich kann nicht mehr machen, als eben die Bilder so gut wie möglich aufzunehmen und zu bearbeiten.
Heute eine meiner Lieblingsfarben, wenn es um Nagellack geht: GRÜN.
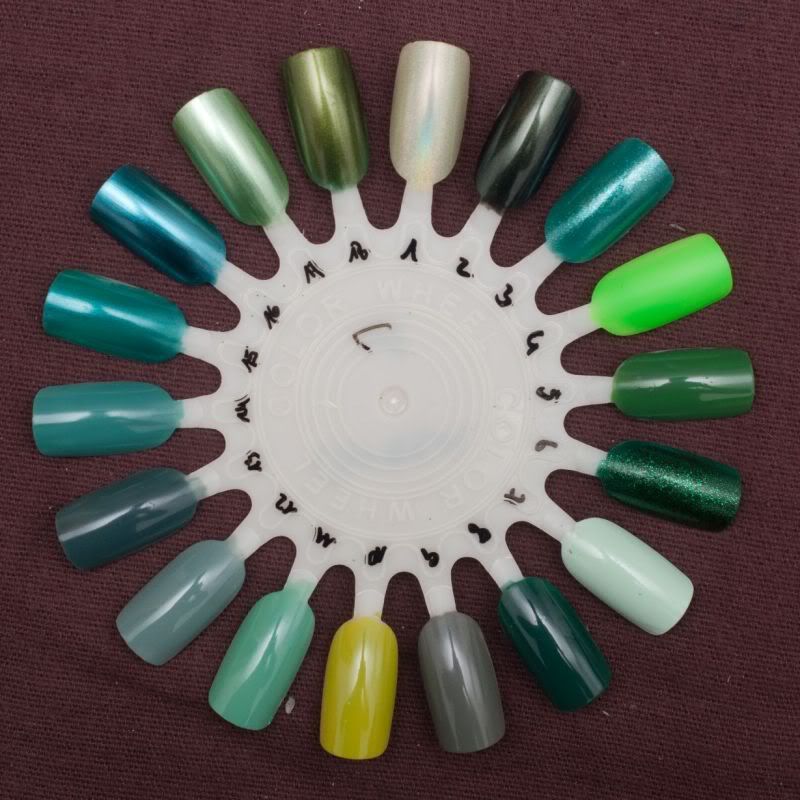
1: ChG L8R G8R
2: ChG Gussied up Green
3: ChG Watermelon Rind
4: ChG Kiwi Cool-Ada
5: ChG Starboard
6: ChG Emerald Sparkle
7: ChG Re-Fresh Mint
8: Essie Going Incognito
9: Essie Sew Psyched
10: Anny Summer Love
11: Anny Green Meets Mint
12: Anny Wicked
13: Rival De Loup 52
14: Manhattan 87 D
15: Basic 249
16: Basic 309
17: Kron Froschkönig
18: P2 Copacabana
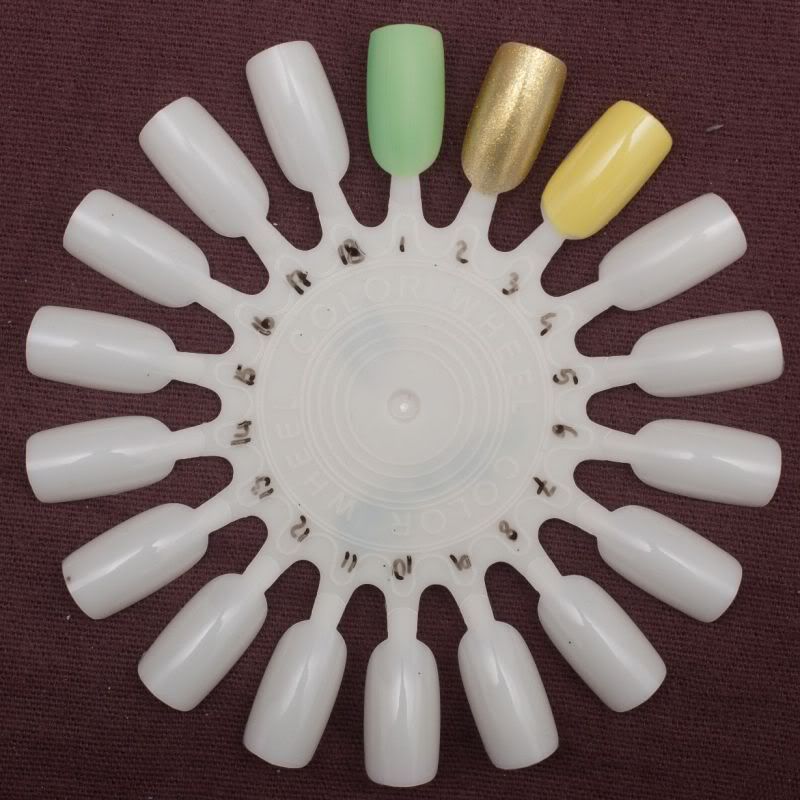
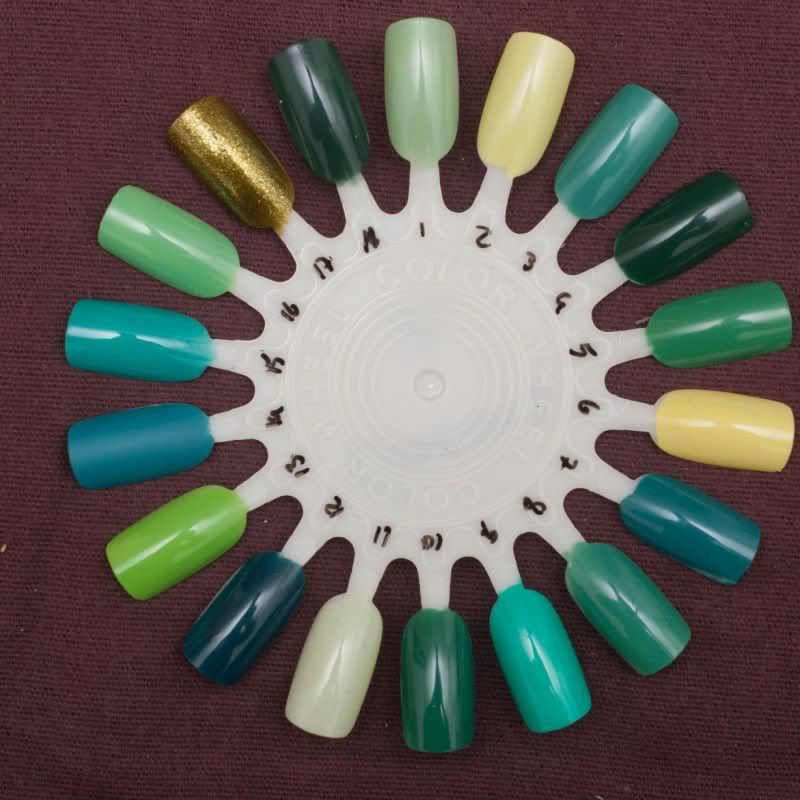 1: Catrice Sold Out Forever
2: Catrice Easy Peasy Lemon Squeezy
3: Catrice I Sea You
4: Catrice Run Forest Run Dark
5: Catrice Run Forest Run Light
6: P2 Trouble 2011
7: P2 Groovy 2011
8: P2 Jetset 2011
9: P2 Artful 2010
10: P2 Trouble 2010
11: P2 Dating Time 2010
12: P2 Dangerous 2010
13: P2 Shockful
14: Orly Viridian Vinyl
15: Orly Green with Envy
16: Orly Mint Mojito
17: Orly It's Not Rocket Science
18: Green Jelly Franken
 1: Orly Here Comes Trouble
2: Orly Walk Down The Isle
3: Orly Ancient Jade
4: Orly Wandering Wine
5: Orly Green Apple
6: Essence Lime up!
7: Essence You belong to me
8: Essence Trust in Fashion
9: Essence You've got the art
10: Essence Replay
11: Essence Bella
12: Essence Trendsetter
13: Essence Into The Jungle Franken
14: Essence I'm a Berliner
15: Artdeco Quick Dry 88
16: Artdeco Creamic 120
17: Flormar N007
18: Rimmel Green with Envy
1: OPI Gargantuan Green Grape Matte
2: OPI Simply Smash-ing
3: Anny Fancy
I always try my best to make the pictures as colour acurate as possible on my calibrated monitor, but keep in mind, that diffrent monitors will display colours diffrently. I can not guarantee, that your monitor will show you the colours as I see them. I am sorry for that, but there is nothing I can do.
Up for today, one of my favorite colours for nail polish: GREEN.
--
Sooo, ich habe endlich alle meine Nail Wheels mit meinen aktuellen Lacken fotografiert. Ich werde versuchen jeden Tag eine Farbfamilie hochzuladen. Diese Posts sind als Referenz zu verstehen, ihr könnt gerne Reviews, Vergleiche und Swatches von allen gezeigten Farben anfordern.
Ich sorge immer dafür, dass die Farben auf meinem kalibrierten Monitor so akurat wie möglich erscheinen, aber ihr müsst euch darüber im Klaren sein, dass verschiedene Monitore Farben unterschiedlich darstellen. Ich kann euch keine Garantie geben, dass euer Monitor die Farben genau so anzeigt, wie ich sie hier sehe. Das tut mir wirklich leid, aber ich kann nicht mehr machen, als eben die Bilder so gut wie möglich aufzunehmen und zu bearbeiten.
Heute eine meiner Lieblingsfarben, wenn es um Nagellack geht: GRÜN.
1: ChG L8R G8R
2: ChG Gussied up Green
3: ChG Watermelon Rind
4: ChG Kiwi Cool-Ada
5: ChG Starboard
6: ChG Emerald Sparkle
7: ChG Re-Fresh Mint
8: Essie Going Incognito
9: Essie Sew Psyched
10: Anny Summer Love
11: Anny Green Meets Mint
12: Anny Wicked
13: Rival De Loup 52
14: Manhattan 87 D
15: Basic 249
16: Basic 309
17: Kron Froschkönig
18: P2 Copacabana
1: Catrice Sold Out Forever2: Catrice Easy Peasy Lemon Squeezy
3: Catrice I Sea You
4: Catrice Run Forest Run Dark
5: Catrice Run Forest Run Light
6: P2 Trouble 2011
7: P2 Groovy 2011
8: P2 Jetset 2011
9: P2 Artful 2010
10: P2 Trouble 2010
11: P2 Dating Time 2010
12: P2 Dangerous 2010
13: P2 Shockful
14: Orly Viridian Vinyl
15: Orly Green with Envy
16: Orly Mint Mojito
17: Orly It's Not Rocket Science
18: Green Jelly Franken
1: Orly Here Comes Trouble2: Orly Walk Down The Isle
3: Orly Ancient Jade
4: Orly Wandering Wine
5: Orly Green Apple
6: Essence Lime up!
7: Essence You belong to me
8: Essence Trust in Fashion
9: Essence You've got the art
10: Essence Replay
11: Essence Bella
12: Essence Trendsetter
13: Essence Into The Jungle Franken
14: Essence I'm a Berliner
15: Artdeco Quick Dry 88
16: Artdeco Creamic 120
17: Flormar N007
18: Rimmel Green with Envy
1: OPI Gargantuan Green Grape Matte
2: OPI Simply Smash-ing
3: Anny Fancy
Catrice I wear my Sunglasses at Night
Over the weekend, 4 of my nails broke. I mean, seriously? That just sucks. I had to file them all down, so they look at least semi-decent.
So, today I'm in mourning ;)
Catrice I wear my Sunglasses at Night is another one of those polishes, that look very cool in the bottle, because of the shimmer, but on the nails, it's kinda blah. It's still a cool polish and in the light the pink and torquoise sparklies are visible, but it's nothing compared to the bottle.
--
Übers Wochenende sind mir 4 meiner Nägel eingerissen. Ehrlich, sowas muss doch nicht sein. Ich musste sie alle runterfeilen, damit sie wenigstens halbwegs anständig aussehen.
Also, heute trage ich Trauer ;)
Catrice I wear my Sunglasses at Night ist wieder einer dieser Lacke, der in der Flasche total klasse aussieht, wegen dem Schimmer, aber auf dem Nagel ist es mehr "Naja". Es ist immernoch ein schöner Lack und im Licht sieht man die pinken und türkiesen Glitzerpartikelchen, aber es ist eben nichts im Vergleich zu dem, was man in der Flasche sieht.
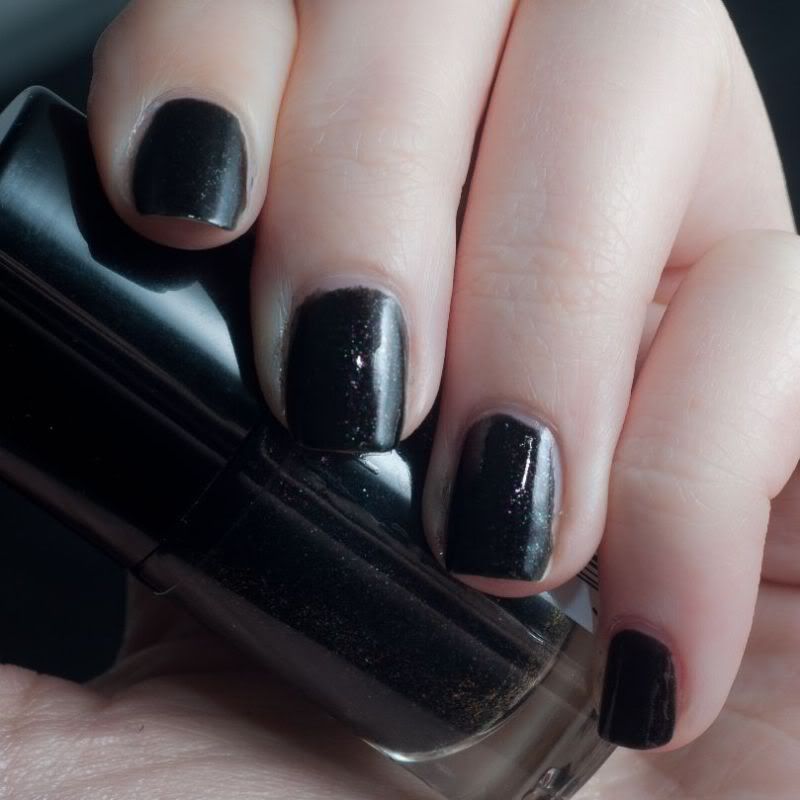
Two coats of Catrice I wear my Sunglasses at Night. Basecoat is Orly Bonder, Topcoat Essence Better Than Gel Nails Top Sealer. Click the pic for the shimmer.
Is there someone else out there, who gets real sad, when something like my weekend accident happens? Do you get demotivated, too? How do you get over the "nail-blues"?
--
Zwei Schichten Catrice I wear my Sunglasses at Night. Unterlack ist Orly Bonder, Überlack Essence Better Than Gel Nails Top Sealer. Klick auf das Bild zeigt den Schimmer.
Ist dadraussen nochjemand, der bei einem solchen Unfall, wie ich ihn am Wochenende hatte seinen Nägeln hinterhertrauert? Seid ihr dann auch ein wenig demotiviert?
So, today I'm in mourning ;)
Catrice I wear my Sunglasses at Night is another one of those polishes, that look very cool in the bottle, because of the shimmer, but on the nails, it's kinda blah. It's still a cool polish and in the light the pink and torquoise sparklies are visible, but it's nothing compared to the bottle.
--
Übers Wochenende sind mir 4 meiner Nägel eingerissen. Ehrlich, sowas muss doch nicht sein. Ich musste sie alle runterfeilen, damit sie wenigstens halbwegs anständig aussehen.
Also, heute trage ich Trauer ;)
Catrice I wear my Sunglasses at Night ist wieder einer dieser Lacke, der in der Flasche total klasse aussieht, wegen dem Schimmer, aber auf dem Nagel ist es mehr "Naja". Es ist immernoch ein schöner Lack und im Licht sieht man die pinken und türkiesen Glitzerpartikelchen, aber es ist eben nichts im Vergleich zu dem, was man in der Flasche sieht.
Two coats of Catrice I wear my Sunglasses at Night. Basecoat is Orly Bonder, Topcoat Essence Better Than Gel Nails Top Sealer. Click the pic for the shimmer.
Is there someone else out there, who gets real sad, when something like my weekend accident happens? Do you get demotivated, too? How do you get over the "nail-blues"?
--
Zwei Schichten Catrice I wear my Sunglasses at Night. Unterlack ist Orly Bonder, Überlack Essence Better Than Gel Nails Top Sealer. Klick auf das Bild zeigt den Schimmer.
Ist dadraussen nochjemand, der bei einem solchen Unfall, wie ich ihn am Wochenende hatte seinen Nägeln hinterhertrauert? Seid ihr dann auch ein wenig demotiviert?
Freitag, 15. April 2011
Catrice Sold out Forever
Catrice Sold out Forever is a pretty close dupe to Chanel Jade. A light green, thats leaning slightly yellow.
In the bottle you can see a fine, light green shimmer, but that sadly does not realy transfer to the nails as it does with Chanel. It's a bit on the sheer side, too and needs three coats at least to be opaque and streak-free. But all that does not keep it from beeing a gorgeous colour.
I might put one of my shimmer frankens over it to make it look a little more like it does in the bottle, I like the subtle effect it gives.
--
Catrice Sold out Forever ist ein recht gutes Dupe für Chanel Jade. Ein Hellgrün mit gelblichem Unterton.
In der Flasche sieht man einen feinen, hellgrünen Schimmer, aber leider sieht man davon auf dem Nagel nichts mehr, im Gegensatz zum Chanel Lack. Sold out Forever ist ein bisschen durchsichtig und braucht auf jedenfall drei Schichten um deckend und streifenfrei zu sein. Nichts desto trotz ist es eine wirklich wunderschöne Farbe.
Ich werde wahrscheinlich noch eine Schichte von einem meiner Schimmer-Franken-Lacke drüberpacken um das ganze ein bisschen mehr wie in der Flasche aussehen zu lassen.
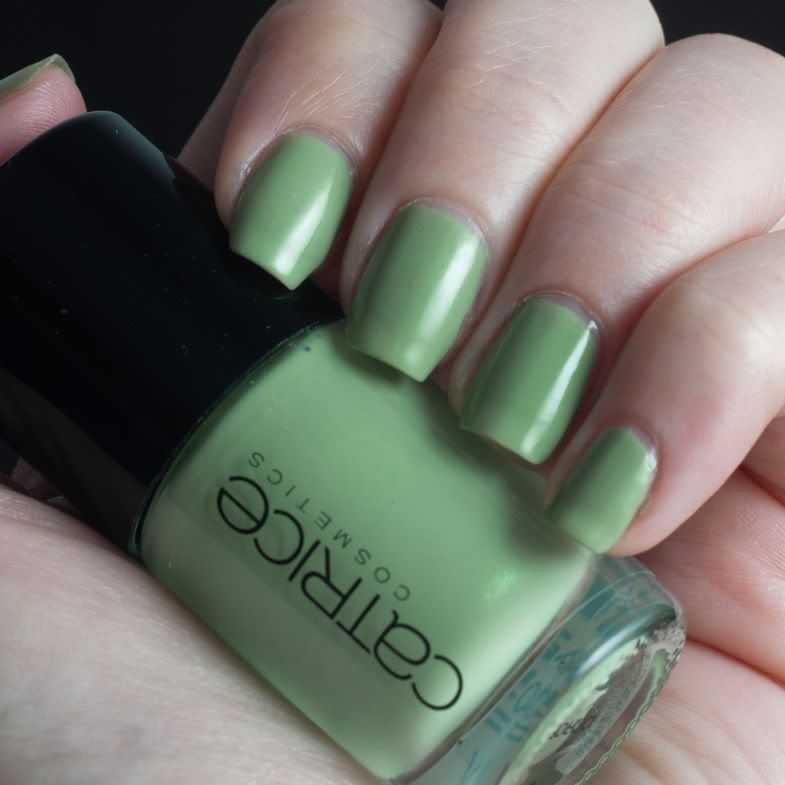
Three coats of Catrice Sold out Forever. Basecoat was Gelous, topcoat Orly Sec'n'Dry.
--
Drei Schichten Catrice Sold out Forever. Unterlack ist Gelous, Überlack Orly Sec'n'Dry.
In the bottle you can see a fine, light green shimmer, but that sadly does not realy transfer to the nails as it does with Chanel. It's a bit on the sheer side, too and needs three coats at least to be opaque and streak-free. But all that does not keep it from beeing a gorgeous colour.
I might put one of my shimmer frankens over it to make it look a little more like it does in the bottle, I like the subtle effect it gives.
--
Catrice Sold out Forever ist ein recht gutes Dupe für Chanel Jade. Ein Hellgrün mit gelblichem Unterton.
In der Flasche sieht man einen feinen, hellgrünen Schimmer, aber leider sieht man davon auf dem Nagel nichts mehr, im Gegensatz zum Chanel Lack. Sold out Forever ist ein bisschen durchsichtig und braucht auf jedenfall drei Schichten um deckend und streifenfrei zu sein. Nichts desto trotz ist es eine wirklich wunderschöne Farbe.
Ich werde wahrscheinlich noch eine Schichte von einem meiner Schimmer-Franken-Lacke drüberpacken um das ganze ein bisschen mehr wie in der Flasche aussehen zu lassen.
Three coats of Catrice Sold out Forever. Basecoat was Gelous, topcoat Orly Sec'n'Dry.
--
Drei Schichten Catrice Sold out Forever. Unterlack ist Gelous, Überlack Orly Sec'n'Dry.
Dienstag, 12. April 2011
NOTD April, 12th 2011
I bought three new Anny polishes and wanted to try them out. I didn't want to do a fullblown Skittle-mani, so I limited myself to two of them.
And again, it shows, that my studioflashes produce so much crisper pictures ... I think I found my photosetup :)
--
Ich habe drei neue Anny Lacke gekauft und wollte die natürlich gleich ausprobieren. Da ich aber keine Skittle-Nägel wollte, habe ich mich auf zwei beschränkt.
Und mal wieder zeigt sich, dass meine Studioblitze einfach sooo viel schärfere und farbgetreuere Bilder ergeben ... Ich denke, ich habe mein ideales Foto-Setup gefunden :)
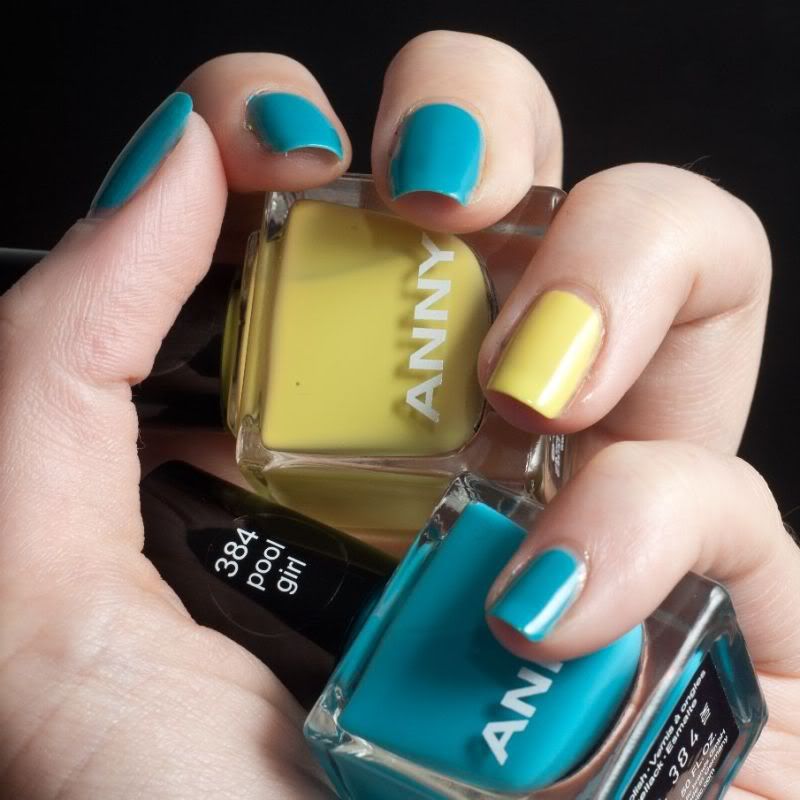 Three coats of Anny Pool Girl on all fingers, except ringfinger, there it was two coats of Anny Fancy. Base-/Topcoat combo is Orly Bonder with Sec'n'Dry.
It's so bright and fun :)
--
Drei Schichten Anny Pool Girl auf allen Fingern, ausser dem Ringfinger, da sind es zwei Schichten Anny Fancy. Unter-/Überlack Kombi ist wieder Orly Bonder und Sec'n'Dry.
So schön bunt :)
And again, it shows, that my studioflashes produce so much crisper pictures ... I think I found my photosetup :)
--
Ich habe drei neue Anny Lacke gekauft und wollte die natürlich gleich ausprobieren. Da ich aber keine Skittle-Nägel wollte, habe ich mich auf zwei beschränkt.
Und mal wieder zeigt sich, dass meine Studioblitze einfach sooo viel schärfere und farbgetreuere Bilder ergeben ... Ich denke, ich habe mein ideales Foto-Setup gefunden :)
It's so bright and fun :)
--
Drei Schichten Anny Pool Girl auf allen Fingern, ausser dem Ringfinger, da sind es zwei Schichten Anny Fancy. Unter-/Überlack Kombi ist wieder Orly Bonder und Sec'n'Dry.
So schön bunt :)
Product Battle: Quick Dry Drops
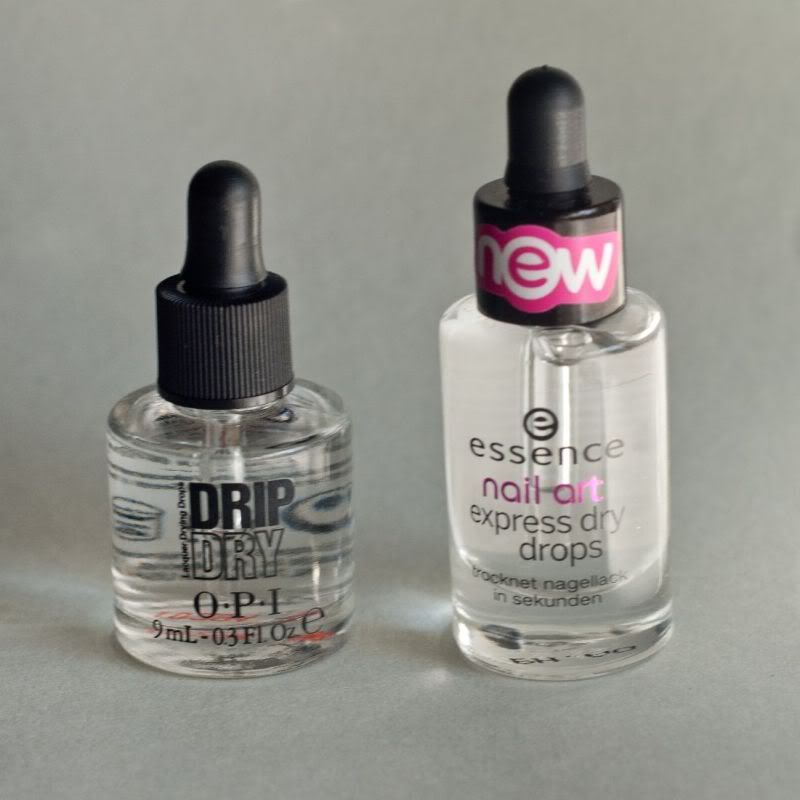
I bought the Essence drops some time ago and found them quite good. Not overwhemlimgly good, but solid. Then I decided to test OPI DripDry. This stuff is about 10 times the price of the Essence Drops here in Germany (I bought it in the US, but it was still about 3-4times more, without shipping), so I expected it to be ... well, not exactly ten times as good, but, you know ... significantly better. To tell the truth ... it's not.
OK, the facts:
They both come in little glass bottles with a dropper. OPI is sold with a normal cap, but a dropper-cap is included seperately (which is kinda silly, if you ask me), while it's already installed in the Essence drops. OPI is 19,95€ here in Germany, $9,99 in the US (depending on where you buy it) for 9ml, Essence sets you back 1,95€, which is about $2,80 for 8ml.
OPI tells you to wait 60 seconds, then put 1-2 drops on each nails. It promises instantly dry nails.
Essence mentions nothing about waiting, but they too tell you to put 1-2 drops on each nail. Their promis is dry nails in 60 seconds. Hmm ...
Both Drops feel oily and leave a residue on the nail, nothing a little soap and water can't fix. They claim to be moisturizing, which I guess they are, but I always use Lemony Flutter by Lush or my own mix of oils for my cuticles anyway.
I tried both products "scientifically" and under real life circumstances with and without topcoat.
My method for the scientific test was as follows:
Polish 4 nails with two coats of a nail polish (I tried Anny, OPI, Essence and China Glaze) ... all four nails with the same polish, of course, to be fair.
On two nails, I put on my Orly Sec'n'Dry.
So now I had two nails with just polish and two with polish and quick dry topcoat. I know, that Sec'n'Dry dries my nails in about 15 minutes, depending on the brand, so I can move about normally.
Now for the drops: one polish and one polish+topcoat nail each got two drops of Essence and OPI drops.
I took a scewer and dug into my polish every 5 minutes.
After about 5 minutes it was realy hard to get a dent in the topcoat nails and after 15 minutes it was the same with the no-topcoat nails. They where pretty much completely dry (meaning: no chance to get a dent in them) after 15 and 25 minutes respectively.
Did you notice how I made no distinction between nails? Yes, that is because there was none. Seriously! They both dried my nails in the exactly same time, there was no difference in shine and with both products the polish dried evenly.
I so did not expect that, but I know, what I'll be using from here on out ... IF I use quick dry drops. Which is rarely and only if I need to get out the door in literally 5 minutes.
My recomendation is Essence, if you can get it. It's cheaper and does the same thing.
--
Vor ein paar Wochen habe ich die Essence Nail Art Express Dry Drops gekauft und fand sie gut. Nicht umwerfend, aber solide. Dann habe ich beschlossen, die OPI Drip Dry Drops auszuprobieren. Das Zeug kostet das ZEHNFACHE im Vergleich zu Essence hier in Deutschland! Ich habe meine OPI Drops aus Amerika bestellt, wo sie $9,99 kosten, immernoch das 3-4fache umgerechnet, und das ohne Versandkosten. OK, ich habe nicht erwartet, dass die OPIs zehnfach besser sind, aber ... naja, schon eben ein ganzes Stück. Um die Wahrheit zu sagen ... sie sind es nicht.
OK, hier die Fakten:
Beide Produkte kommen in kleinen Glasfläschlein daher. Bei OPI wird ein Deckel mit Pipette seperat mitgeliefert, in der Packung ist es mit einem normalen Verschluss, bei Essence ist die Pipette schon in der Flasche beim Kauf, es gibt keinen extra Deckel.
OPI kostet 19,95€ für 9ml bei Douglas, während Essence in vielen Drogerien zu haben ist und 1,95€ pro 8ml Fläschchen kostet.
Die Instruktionen für OPI besagen, dass man 60 Sekunden warten und dann 1-2 Tropfen auf jeden Nagel geben soll. Sie versprechen sofort trockenen Nagellack.
Essence sagt nichts von Wartezeiten und versprechen trockenen Lack in 60 Sekunden ... hmmm
Beide Tropfen fühlen sich ölig an und hinterlassen einen Film auf den Nägeln, nichts, was ein bisschen Wasser und Seife nicht beseitigen könnte. Beide Drops behaupten von sich die Nagelhaut zu pflegen. ... kann schon sein, ich benutze immer Lemony Flutter von Lush und mein Öl-gemisch, also kann ich da nicht allzuviel zu sagen.
Ich habe beide Produkte sowohl "wissenschaftlich" als auch unter normalen Nutzungsbedingungen ausprobiert.
Der wissenschaftliche Versuch sah wie folgt aus:
Ich habe 4 Nägel mit einem Lack lackiert (ich habe verschiedene Tests mit verschiedenen Marken ausprobiert).
Auf zwei Nägel habe ich Orly Sec'n'Dry aufgetragen und hatte dann je 2 Nägel mit 2 Schichten Lack mit und ohne schnelltrocknendem Überlack. Ich weiss, dass Sec'n'Dry meine Nägel, je nach Farblack in ca 15 Minuten soweit trocknet, dass ich wieder normalen Tätigkeiten, auch Tippen nachgehen kann.
Jetzt zu den Tropfen: Ich habe jeweils einen Nagel mit und ohne Überlack mit je zwei Drops beträufelt.
Dann habe ich mir einen Zahnstocher geschnappt und alle 5 Minuten in den Lack gepiekt. Nach 5 Minuten war es schon schwierig eine sichtbare Delle in den Lack mit Überlack zu machen, nach 15 Minuten das selbe bei den Nägeln ohne Überlack. Richtig durchgetrocknet waren die Nägel in 15 Minuten ohne und 25 Minuten mit Überlack.
Ist euch aufgefallen, dass ich keinen Unterschied gemacht habe? Japp, das kommt daher, dass es keinen gibt. Ja, ehrlich! Beide Tropfen haben meine Nägel genau gleich schnell getrocknet, beim Glanz gab es auch keinen Unterschied und beide Produkte haben den Lack gleichmässig getrocknet.
Das habe ich jetzt so GAR nicht erwartet. Aber ich weiss, was ich zukünftig benutzen werde, wenn ich mal Quick Dry Drops benutze, was eigentlich nur dann ist, wenn ich wirklich nur die sprichwörtlichen 5 Minuten zum fertig machen habe.
Meine Empfehlung: Essence, weil es einfach so viel günstiger ist und genau das Gleiche tut.
Montag, 11. April 2011
OPI Simply Smash-ing
I'm not entirely sure about this colour. It's not, that I have anything against greenish-yellow colours, but this one ... dunno. It does strange things to my skintone, I think.
Still, it's a cool colour, it's sparkly and fun in a way that is not too loud. That doesn't mean it's an office appropriate colour, mind you!
Simply Smash-ing is not a pure gold and not realy a lime colour. It's a slightly greened, foil-y gold. I have nothing, that is even remotely close.
It's painfully sheer, though. I can deal with 3 coats, normaly do two on most polishes anyway, but visible nail lines at 5 coats is just not acceptible. Other than that: usual OPI quality, no complaints, other than the fact, that OPI tends to chip on me far too quickly, but that is a problem with my nails, not the laquer.
--
Ich weiss noch nicht so richtig, was ich von dieser Farbe halten soll. Normalerweise habe ich nichts gegen diese grünlich gelben Farben, aber dieser spezielle Lack ... keine Ahnung. Ich denke, es macht einfach etwas ganz Unschönes mit meiner Hautfarbe.
Nichtsdestotrotz ist es eine klasse Farbe, es glitzert und macht Spass, ohne zu "krass" rüberzukommen. Das heisst nicht, dass es eine Farbe ist, die ich im Büroalltag tragen würde!
Simply Smash-ing ist kein reines Gold aber auch keine "Limetten" Farbe, es ist ein grünlicher Goldton mit Foil-finish. Ich habe nichts, was dem auch nur annähernd gleich kommt.
Der Lack ist allerdings SEHR durchsichtig. Mit 3 Schichten kann ich umgehen, ich lackiere sowieso immer 2, aber, dass mein Nagelrand nach 5 Schichten immernoch sichtbar ist, ist einfach nicht mehr schön. Davon abgesehen: übliche OPI Qualität, keine Probleme, ausser dass OPI bei mir unglaublich schnell splittert, aber das ist mehr ein Problem mit meinen Nägeln, als mit dem Lack.

5 coats of OPI Simply Smash-ing, base-/topcoat is my trusty combination of Orly Bonder and Orly Sec'n'Dry.
--
5 Schichten OPI Simply Smash-ing, Unter-/Überlack ist meine vertraute Kombi: Orly Bonder und Orly Sec'n'Dry.
Still, it's a cool colour, it's sparkly and fun in a way that is not too loud. That doesn't mean it's an office appropriate colour, mind you!
Simply Smash-ing is not a pure gold and not realy a lime colour. It's a slightly greened, foil-y gold. I have nothing, that is even remotely close.
It's painfully sheer, though. I can deal with 3 coats, normaly do two on most polishes anyway, but visible nail lines at 5 coats is just not acceptible. Other than that: usual OPI quality, no complaints, other than the fact, that OPI tends to chip on me far too quickly, but that is a problem with my nails, not the laquer.
--
Ich weiss noch nicht so richtig, was ich von dieser Farbe halten soll. Normalerweise habe ich nichts gegen diese grünlich gelben Farben, aber dieser spezielle Lack ... keine Ahnung. Ich denke, es macht einfach etwas ganz Unschönes mit meiner Hautfarbe.
Nichtsdestotrotz ist es eine klasse Farbe, es glitzert und macht Spass, ohne zu "krass" rüberzukommen. Das heisst nicht, dass es eine Farbe ist, die ich im Büroalltag tragen würde!
Simply Smash-ing ist kein reines Gold aber auch keine "Limetten" Farbe, es ist ein grünlicher Goldton mit Foil-finish. Ich habe nichts, was dem auch nur annähernd gleich kommt.
Der Lack ist allerdings SEHR durchsichtig. Mit 3 Schichten kann ich umgehen, ich lackiere sowieso immer 2, aber, dass mein Nagelrand nach 5 Schichten immernoch sichtbar ist, ist einfach nicht mehr schön. Davon abgesehen: übliche OPI Qualität, keine Probleme, ausser dass OPI bei mir unglaublich schnell splittert, aber das ist mehr ein Problem mit meinen Nägeln, als mit dem Lack.
5 coats of OPI Simply Smash-ing, base-/topcoat is my trusty combination of Orly Bonder and Orly Sec'n'Dry.
--
5 Schichten OPI Simply Smash-ing, Unter-/Überlack ist meine vertraute Kombi: Orly Bonder und Orly Sec'n'Dry.
Freitag, 8. April 2011
Nail Wheels
Today I got my nail wheels (that's why I went to customs) and started swatching my collections. I'm halfway through and found two or three dupes, that will probably find a new home soon. It's realy good to see them all compared like that.
When I'm done, I'll do pictures with names, if anyone is interested.
--
Heute hab ich meine Nail Wheels bekommen (deshalb war ich heute beim Zoll) und habe angefangen alle meine Lacke zu swatchen. Ich bin auf halbem Wege durch und habe schon so zwei, drei Dupes gefunden, die demnächst bestimmt ein neues zuhause finden werden. Ich bekomme langsam einen Überblick.
Wenn ich fertig bin, mache ich Bilder, mit Namen, wenn es euch interessiert.
Quick NotD
Very quickly, before I head out to customs, my nails for today:
--
Ganz schnell, bevor ich mich zum Zoll aufmache, meine Nägel für heute:

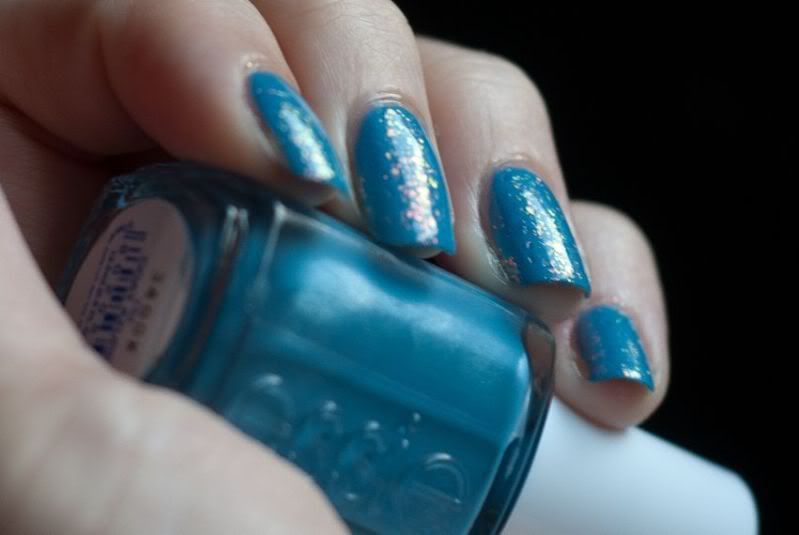
Two coats Essie Coat Azure and over that two coats of Nubar 2010. Basecoat of the day is Gelous, topcoat is Essence Better than Gel Nails Top Sealer. Sooo pretty :)
Zwei Schichten Essie Coat Azure, darüber zwei Schichten Nubar 2010. Unterlack für heute ist Gelous, Überlack Essence Better than Gel Nails Top Sealer. Soooo hübsch!
--
Ganz schnell, bevor ich mich zum Zoll aufmache, meine Nägel für heute:
Two coats Essie Coat Azure and over that two coats of Nubar 2010. Basecoat of the day is Gelous, topcoat is Essence Better than Gel Nails Top Sealer. Sooo pretty :)
Zwei Schichten Essie Coat Azure, darüber zwei Schichten Nubar 2010. Unterlack für heute ist Gelous, Überlack Essence Better than Gel Nails Top Sealer. Soooo hübsch!
Donnerstag, 7. April 2011
China Glaze metallic silvers comparison
I got China Glaze Millenium a few days ago and wanted to compare it to two other China Glaze silvers (Platinum Silver and Devotion) I own. Millenium is an AWESOME silver. It's not streaky at all and with a ridgefilling basecoat underneath it gets realy reflective!
Platinum Silver has very obvious brush strokes and is all in all harder to work with (I always get bubbles and clumps and general unevenness). Plus, even at two coats it's not realy opaque, I'd probably do 3-4 coats to feel realy comfortable.
Devotion is also showing strokes, but not AS bad, as PS. It's also more purple-toned, than the other two, not realy a pure silver. Two coats is good, 3 better, but only if you are picky.
Millenium is AWESOME!!! Sorry. It does not show any significant brush strokes, it's a cool, pure silver and even at one coat it's pretty opaque. It's very good for stamping, too!
--
Vor ein paar Tagen habe ich China Glaze Millenium bekommen und wollte das Schätzchen gleich mal mit den zwei anderen metallisch-silbernen Lacken (Platinum Silver und Devotion) von China Glaze in meiner Sammlung vergleichen. Millenium ist ein absolut FANTASTISCHES Silber. Es sind keine/kaum Pinselstriche zu sehen und mit einem ausgleichenden Basecoat drunter hat man eine wunderbar reflektierende Oberfläche.
Platinum Silver zeigt sehr deutlich die Pinselstriche und ist generell schwierig im Auftrag (Ich habe ständig Blasen oder Lack-Blops und es wird auch nicht wirklich gleichmässig). Selbst nach zwei Schichten ist er immernoch nicht so richtig deckend. Ich würde wahrscheinlich 3-4 Schichten auftragen.
Bei Devotion sieht man ebenfalls Pinselstriche, wenn auch nicht ganz so schlimm, wie bei PS. Es ist auch, verglichen mit den beiden anderen etwas lila-stichig, also kein reines Silber. Zwei Schichten reichen, drei sind aber besser, wenn man es wirklich eben haben möchte.
Millenium ist GENIAL! Sorry. Es wird wirklich schön eben und ist ein kühles, reines Silber. Selbst bei einer Schicht deckt dieser Lack gut und eignet sich damit auch hervorragend für Nagelstamping.
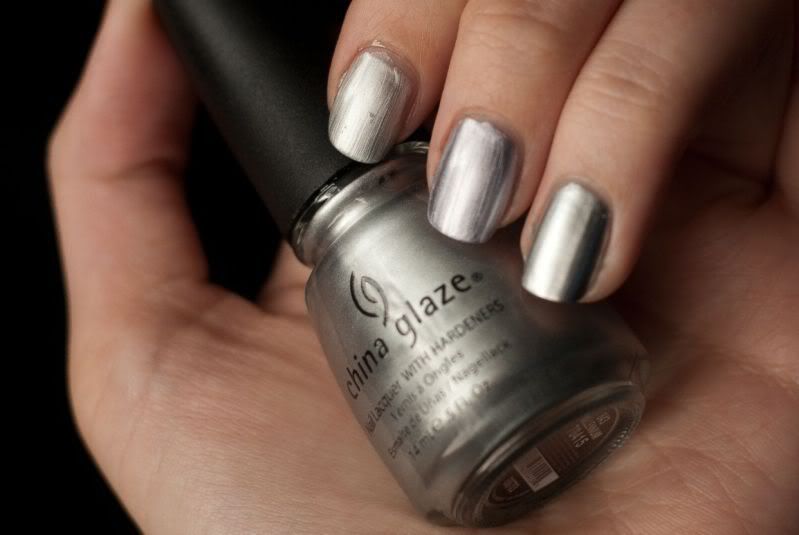
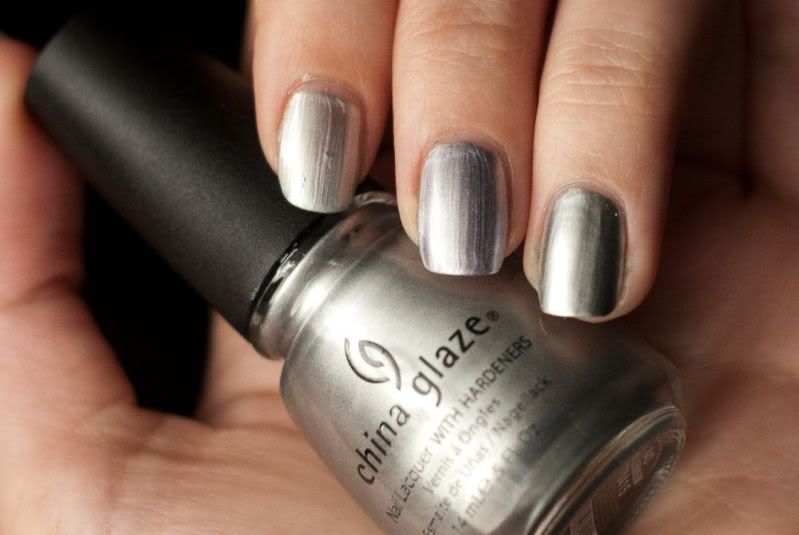
China Glaze 77051 Platinum Silver on pointer, 80213 Devotion on middle and 70415 Millenium on ringfinger, all two coats.
--
China Glaze 77051 Platinum Silver auf dem Zeige-, 80213 Devotion auf Mittel- und 70415 Millenium auf dem Ringfinger, alles zwei Schichten.
Platinum Silver has very obvious brush strokes and is all in all harder to work with (I always get bubbles and clumps and general unevenness). Plus, even at two coats it's not realy opaque, I'd probably do 3-4 coats to feel realy comfortable.
Devotion is also showing strokes, but not AS bad, as PS. It's also more purple-toned, than the other two, not realy a pure silver. Two coats is good, 3 better, but only if you are picky.
Millenium is AWESOME!!! Sorry. It does not show any significant brush strokes, it's a cool, pure silver and even at one coat it's pretty opaque. It's very good for stamping, too!
--
Vor ein paar Tagen habe ich China Glaze Millenium bekommen und wollte das Schätzchen gleich mal mit den zwei anderen metallisch-silbernen Lacken (Platinum Silver und Devotion) von China Glaze in meiner Sammlung vergleichen. Millenium ist ein absolut FANTASTISCHES Silber. Es sind keine/kaum Pinselstriche zu sehen und mit einem ausgleichenden Basecoat drunter hat man eine wunderbar reflektierende Oberfläche.
Platinum Silver zeigt sehr deutlich die Pinselstriche und ist generell schwierig im Auftrag (Ich habe ständig Blasen oder Lack-Blops und es wird auch nicht wirklich gleichmässig). Selbst nach zwei Schichten ist er immernoch nicht so richtig deckend. Ich würde wahrscheinlich 3-4 Schichten auftragen.
Bei Devotion sieht man ebenfalls Pinselstriche, wenn auch nicht ganz so schlimm, wie bei PS. Es ist auch, verglichen mit den beiden anderen etwas lila-stichig, also kein reines Silber. Zwei Schichten reichen, drei sind aber besser, wenn man es wirklich eben haben möchte.
Millenium ist GENIAL! Sorry. Es wird wirklich schön eben und ist ein kühles, reines Silber. Selbst bei einer Schicht deckt dieser Lack gut und eignet sich damit auch hervorragend für Nagelstamping.
China Glaze 77051 Platinum Silver on pointer, 80213 Devotion on middle and 70415 Millenium on ringfinger, all two coats.
--
China Glaze 77051 Platinum Silver auf dem Zeige-, 80213 Devotion auf Mittel- und 70415 Millenium auf dem Ringfinger, alles zwei Schichten.
Hello World
So, how to start a blog?
My nail polish addiction (there is no other way to describe it) started with Rimmel Green With Envy and it was all downhill after that.
In real life, I'm a photographer in my mid twenties and live in Germany. I don't realy have a set "goal" with this blog, it's a way for me to share what I love and in the process maybe help some of you with swatches and comparisons.
I will try to do all my entries in english as well as german, my collection is mostly made up out of drugstore and mid range polishes. I don't believe, that the high-end polishes justify their pricetag (especially here in germany). Sure, some of the colours are pretty unique and maybe there will be a Chanel or Dior polish I just can't walk past, but till then, I'll just stick to my promise not to spent more than 12€ on one bottle of polish.
--
Ähm, wie startet man einen Blog?
Für mich begann meine Sucht mit Rimmel Green With Envy und von da an ging es bergab.
Im wahren Leben bin ich Fotografin, mitte Zwanzig und komme aus Deutschland. Ich weiss nicht so recht, worauf ich mit diesem Blog hinaus will, es ist mehr oder weniger schlicht ein Medium eine meiner Leidenschaften mit Gleichgesinnten zu teilen und vieleicht kann ich einigen von euch da draussen mit Swatches und Vergleichen behilflich sein.
Ich werde versuchen alle meine Einträge sowohl in Deutsch als auch in Englisch zu verfassen. Meine Sammlung besteht grösstenteils aus Lacken im niedrigen und mittleren Preissegment, nicht alle sind in Deutschland einfach erhältlich (wie z.B. China Glaze). Ich glaube nicht daran, dass die hochpreisigen Lacke ihrem Preis wirklich gerecht werden. Klar gibt es sicher einzigartige Farben und vieleicht gibt es auch irgendwann einen Chanel oder Dior Lack dem ich einfach nicht widerstehen kann, aber bis dahin bleibe ich meinem Versprechen treu nicht mehr als 12€ für einen Lack auszugeben ;)
--
So, here is a Swatch of the "Polish-That-Started-It-All" / Hier also ein Swatch vom "Lack-Mit-Dem-Alles-Begann":
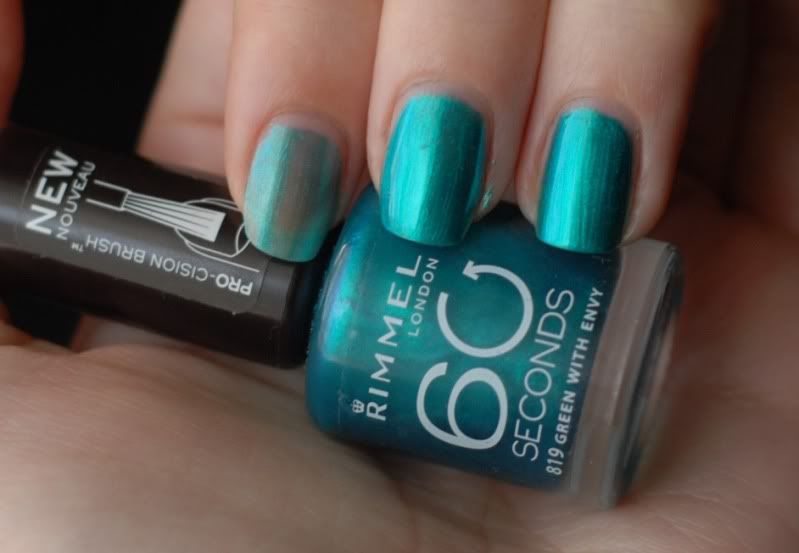
Rimmel 819 Green With Envy
One coat on pointer, two on middle and three on ringfinger. No top or base coat.
I think, two is enough, three is only necessary if you want to make extra sure nothing shows through.
It's a very pretty blue leaning green, with an almost metallic finish. Sadly a little brush-strokey.
--
Eine Schicht auf dem Zeige-, zwei auf dem Mittel- und drei auf dem Ringfinger. Kein Über- oder Unterlack.
Zwei Schichten is genug, denke ich, drei sind nur dann fällig, wenn ihr wirklich sicher gehen wollt, dass man nichts durchsieht.
Ein sehr hübsches, blaustichiges Grün mit einem leichten metallischen Finish. Leider sieht man die Pinselstriche.
My nail polish addiction (there is no other way to describe it) started with Rimmel Green With Envy and it was all downhill after that.
In real life, I'm a photographer in my mid twenties and live in Germany. I don't realy have a set "goal" with this blog, it's a way for me to share what I love and in the process maybe help some of you with swatches and comparisons.
I will try to do all my entries in english as well as german, my collection is mostly made up out of drugstore and mid range polishes. I don't believe, that the high-end polishes justify their pricetag (especially here in germany). Sure, some of the colours are pretty unique and maybe there will be a Chanel or Dior polish I just can't walk past, but till then, I'll just stick to my promise not to spent more than 12€ on one bottle of polish.
--
Ähm, wie startet man einen Blog?
Für mich begann meine Sucht mit Rimmel Green With Envy und von da an ging es bergab.
Im wahren Leben bin ich Fotografin, mitte Zwanzig und komme aus Deutschland. Ich weiss nicht so recht, worauf ich mit diesem Blog hinaus will, es ist mehr oder weniger schlicht ein Medium eine meiner Leidenschaften mit Gleichgesinnten zu teilen und vieleicht kann ich einigen von euch da draussen mit Swatches und Vergleichen behilflich sein.
Ich werde versuchen alle meine Einträge sowohl in Deutsch als auch in Englisch zu verfassen. Meine Sammlung besteht grösstenteils aus Lacken im niedrigen und mittleren Preissegment, nicht alle sind in Deutschland einfach erhältlich (wie z.B. China Glaze). Ich glaube nicht daran, dass die hochpreisigen Lacke ihrem Preis wirklich gerecht werden. Klar gibt es sicher einzigartige Farben und vieleicht gibt es auch irgendwann einen Chanel oder Dior Lack dem ich einfach nicht widerstehen kann, aber bis dahin bleibe ich meinem Versprechen treu nicht mehr als 12€ für einen Lack auszugeben ;)
--
So, here is a Swatch of the "Polish-That-Started-It-All" / Hier also ein Swatch vom "Lack-Mit-Dem-Alles-Begann":
Rimmel 819 Green With Envy
One coat on pointer, two on middle and three on ringfinger. No top or base coat.
I think, two is enough, three is only necessary if you want to make extra sure nothing shows through.
It's a very pretty blue leaning green, with an almost metallic finish. Sadly a little brush-strokey.
--
Eine Schicht auf dem Zeige-, zwei auf dem Mittel- und drei auf dem Ringfinger. Kein Über- oder Unterlack.
Zwei Schichten is genug, denke ich, drei sind nur dann fällig, wenn ihr wirklich sicher gehen wollt, dass man nichts durchsieht.
Ein sehr hübsches, blaustichiges Grün mit einem leichten metallischen Finish. Leider sieht man die Pinselstriche.
Abonnieren
Posts (Atom)